


SKU 45338 For technical questions, please call 1-800-444-3353. Page 10
Tool Set Up
TO PREVENT
SERIOUS INJURY
FROM ACCIDENTAL
OPERATION:
Turn the Power Switch of the
tool to its “OFF” position and
unplug the tool from its
electrical outlet before
performing any inspection,
maintenance, or cleaning
procedures.
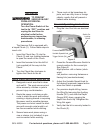
The Hammer Drill is equipped with
a keyed Chuck (2). Follow these steps to
insert a bit.
Insert the Chuck Key (3) into the 1.
Chuck (2) and turn counterclockwise
to open the mouth of the Chuck.
Insert the hammer bit or the drill bit 2.
(not supplied) all the way into the
Chuck.
Turn the Chuck Key clockwise to 3.
tighten the Chuck on the bit.
Work Piece and Work Area Set Up
Designate a work area that is clean 1.
and well-lit. The work area must not
allow access by children or pets to
prevent injury and distraction.
Route the power cord along a safe 2.
route to reach the work area without
creating a tripping hazard or exposing
the power cord to possible damage.
The power cord must reach the work
area with enough extra length to al-
low free movement while working.
Secure loose work pieces using a 3.
vise or clamps (not included) to pre-
vent movement while working.
There must not be hazardous ob-4.
jects, such as utility lines or foreign
objects, nearby that will present a
hazard while working.
General Operating Instructions
Plug the Line Cord into an electrical 1.
outlet.
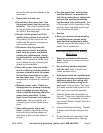
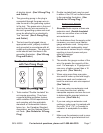
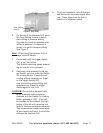
Forward/Reverse Switch
Variable Speed Knob
Trigger Switch (24)
Switch On
Locking
Button
Figure E
2. Press the Forward/Reverse Switch to
correct position for the current job.
See Figure E.
Right position: drill or fasten (clock-
wise).
Left position: removing fasteners or
freeing bits (counterclockwise).
Adjust the Variable Speed Knob for 3.
the desired (maximum) speed action
when the Switch is pressed.
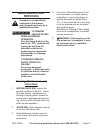
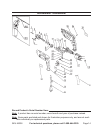
For precision depth drilling, loosen 4.
the Wing Nut securing the Auxiliary
Handle (501), and slide the Depth
Gauge (502) down, gauging the
depth from the bit tip. Retighten the
Wing Nut again.
Verify that the bit is securely locked in 5.
the Chuck (2).