


Page 6 For technical questions, please call 1-800-444-3353. Item 67854
Operating Instructions
Read the ENTIRE IMPORTANT SAFETY INFORMATION section at the beginning of this
manual including all text under subheadings therein before set up or use of this product.
Function
The Auto-Darkening Welding Helmet is designed to protect the eyes and face from sparks, splatter, and
harmful radiation under normal welding conditions. The Auto-Darkening Filter automatically changes from
a clear state to a dark state when an arc is struck, and it returns to the clear state when welding stops.
Before Welding
The Auto-Darkening Welding Helmet comes ready
for use. The only things you need to do before
welding are to remove the protective film from both
sides of the lens (if not already done), adjust the
position of the headband, select the correct shade
number for your application, and test the helmet
for proper operation as described following.
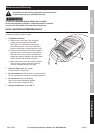
Check the Front Cover Lens to make sure that it is clean,
and that no dirt is covering the two sensors on the
front of the Filter Cartridge. Also check the Front/
InsideCoverLensandtheFrontLensRetainingFrame,
and make sure that they are secured in place.
Inspect all operating parts before each use for signs
of wear or damage. Any scratched, cracked, or
pitted parts should be replaced immediately before
using again to avoid severe personal injury.
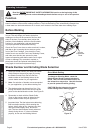
Shade
Control
Knob
Tension
Adjustment
Knob
Figure A
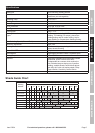
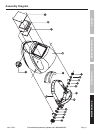
Shade Number and Grinding Mode Selection
1. Select the shade number you need (see Shade
Guide Chart on the previous page) by turning
the Shade Control Knob. Be sure that the
shade number of the Welding Helmet is the
correct shade number for your application.
2. Note: If a selection of shades are recommended
for your application, try the darkest setting first.
3. The shade number can be set from 9 to 13 by
turning the Shade Control Knob until the arrow
points to the desired shade number. See Figure B.
4. RemembertocheckwiththeShadeGuide
Chart on the previous page to determine the
proper shade number for your application.
5. Important Note: Test the helmet auto-darkening
filter lens before welding. While wearing the
helmet, briefly strike an arc, keeping your face
and eyes turned slightly away, and to one
side. The lens should darken evenly when not
directly facing the arc. If it does not darken
properly, do not use the Welding Helmet.
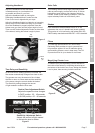
Grind Mode Setting
To change to Grinding Mode, rotate the
Shade Control Knob counterclockwise to
Grind. This turns off the shade function so
the helmet lens stays clear. Use this function
to provide protection while grinding.
CAUTION! Set the helmet to the proper
shade setting before welding again.
9
10
1
1
12
13
G
r
i
n
d
GRIND 9
10
11
12
13
Figure B
SAFETY OPERATION MAINTENANCESPECIFICATIONS