


Page 9For technical questions, please call 1-800-444-3353.SKU 90045
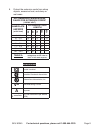
SPECIFICATIONS
Electrical Input 120 V~ / 60 Hz / 7.5 A (Rated)
Belt Speed
Belt Size 3” x 21”
Accessories Dust Bag / 120 Grit Belt
E194601
UNPACKING
When unpacking, make sure that the
item is intact and undamaged. If any parts
are missing or broken, please call Harbor
possible.
ASSEMBLY
Read the ENTIRE IMPORTANT
SAFETY INFORMATION
section at the beginning of this
manual including all text under
subheadings therein before set up
or use of this product.
TO PREVENT
SERIOUS INJURY
FROM ACCIDENTAL
OPERATION:
Turn the Trigger of the tool off
and unplug the tool from its
electrical outlet before
assembling or making any
adjustments to the tool.
Note: For additional information regarding the
parts listed in the following pages, refer
to the Assembly Diagram near the end of
this manual.
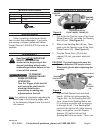
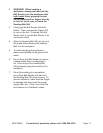
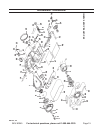
To Remove/Install A Sanding Belt:
Figure A
TENSION LEVER OF
FRONT WHEEL FRAME (53)
SANDING
BELT (46)
TRIGGER
(66)
1.
Wheel Frame (53), and slide the Sanding
Belt (46) out. (See Figure A.)
Slide a new Sanding Belt (46) on. Then, 2.
Wheel Frame (53). (See Figure A.)
Plug the Power Cord (14) into the 3.
nearest 120 volt, grounded, electrical
outlet.
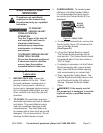
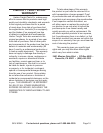
CAUTION! The machined parts near the
Tension Adjuster (29) may be sharp.
Wear work gloves when adjusting the
tension.
Figure B
TENSION
ADJUSTER
(29)
TRIGGER
(66)
SWITCH LOCK
LEFT
HOUSING
(18)
4.
Trigger (66). As the Sanding Belt (46)
turns, observe the Sanding Belt to see
to the right or left. If the Sanding Belt
moves to the right or left, while wearing
heavy work gloves, turn the Tension
Adjuster (29) right or left until the
REV 04j; 09k