


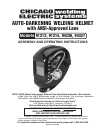
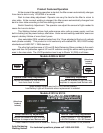

Auto-Darkening
For technical questions, please call 1-800-444-3353. Page 8
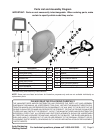
Welding Helmet
MAINTENANCE CONTINUED
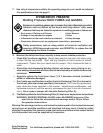
REPLACING THE LENS COVER FOR SKU 94337 AND 94336.
Replace the Front Lens Cover (2) if it is damaged (cracked, scratched, soiled or
pitted). Refer to the illustration below.
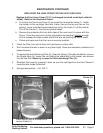
a. To remove the Front Lens Cover (2) you must first remove the frame (1). Inside
the helmet on the cartridge there are 4 tabs, (two on the top and two on the
bottom). Use a small flat-head screwdrivers to pry the frame (1) off the helmet.
Pull off the Frame (1). See the two photos below.
b. Remove the protection film from both sides of the new Lens if it comes with the
film on. Place the new Lens into the right position by bending it slightly, enough
to fit in between the tabs at each side of the lens and putting the lens in place.
c. Check and make sure that the Lens is securely installed.
2. Clean the Filter Lens with a clean lint-free tissue or cotton cloth.
3. Don’t immerse the lens in water or any other liquid. Never use abrasives, solvents or oil
based cleaners.
4. To remove the Auto-Darkening Filter (3): Open the Spring (15) inside the helmet, remove
the Shade Knob (4), loosen the nut holding the shade dial to the helmet, and remove
the dial and filter. Never try to open the Auto-darkening Filter (3).
5. Re-attach the frame by pressing it back on over the cartridge from the front. Secure it
using the tabs inside the helmet.
6. Storage temperature: -4 to 158° F.
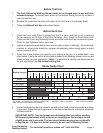
Frame (1)
Tabs
Tabs
Tabs
Tabs
Press tabs up with a screwdriver to
remove Frame (1).
07j