


SKU 94533 For technical questions, please call 1-800-444-3353 PAGE 2
OPERATING INSTRUCTIONS
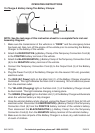
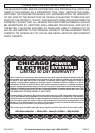
To Charge A Battery Using The Battery Clamps:
8
3
1
2
NOTE: See the last page of this instruction sheet for a complete Parts List and
Assembly Diagram.
Make sure the transmission of the vehicle is in “PARK” and the emergency brake
has been set. Also, turn off the engine of the vehicle prior to connecting the Battery
Charger to the battery of the vehicle.
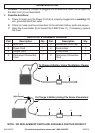
Attach the RED/POSITIVE (+) Battery Clamp of the Temporary Connection Cord (8)
to the POSITIVE battery terminal of the vehicle.
Attach the BLACK/NEGATIVE (–) Battery Clamp of the Temporary Connection Cord
(8) to the NEGATIVE battery terminal of the vehicle.
Connect the Temporary Connection Cord (8) to the Output Cord (3) of the Battery
Charger.
Plug the Power Cord (2) of the Battery Charger into the nearest 120 volt, grounded,
electrical outlet.
The RED (AC Power) light on the Main Unit (1) of the Battery Charger should be
illuminated. This light indicates the Main Unit is receiving 120 volt electrical power
from the electrical outlet.
The YELLOW (Charging) light on the Main Unit (1) of the Battery Charger should
be illuminated. This light indicates charging is taking place.
The GREEN (Charged) light on the Main Unit (1) of the Battery Charger will illuminate
when the vehicles’ battery is fully charged.
Once the vehicle’s battery is fully charged, unplug the Power Cord (2) from its 120 volt
electrical outlet. Disconnect the RED/POSITIVE (+) Battery Clamp of the Temporary
Connection Cord (8) from the POSITIVE battery terminal of the vehicle’s battery.
Then disconnect the BLACK/NEGATIVE (–) Battery Clamp from the Temporary
Connection Cord (8) from the NEGATIVE battery terminal of the vehicle’s battery.
Make sure to store all parts of the Battery Charger in a clean, dry, safe location out
of reach of children.
1.
2.
3.
4.
5.
6.
7.
8.
9.
10.