


SKU 91811 For technical questions, please call 1-800-444-3353. Page 10
OPERATING INSTRUCTIONS
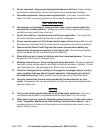
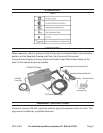
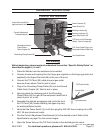
Controls and Indicators
TIG Welding
Before beginning, please read and understand the section “Specific Safety Rules” as
described on pages 5, 6, and 7.
1. Place the Welder near the workpiece to be welded.
2. Connect a hose and coupling from the Argon gas regulator on the Argon gas tank (not
supplied) to the Argon Gas Inlet (49) at the rear of the unit.
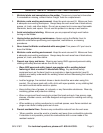
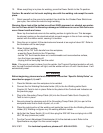
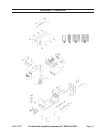
3. Connect the TIG Torch (52) cable plug and gas outlet
hose as shown above. Twist to lock in place.
4. Plug in the Grounding Clamp/Cable (54) into the Ground
Cable Quick Coupler (8). Twist to lock in place.
5. Securely place the clamping end of the Grounding
Clamp/Cable (54) to a part of the workpiece metal that is
clean of paint, oil, or dirt.
6. Assemble the desired accessories and rod to the tip of
the TIG Torch (52) handle. Welding rod types may vary
for welding different metals.
7. Verify that the Power Switch (3) is off, then plug the 220 VAC line cord plug into a 220
VAC, 20 amp (minimum) outlet.
8. Turn the Current Adjustment Potentiometer (4) to the desired current. Refer to the
Specifications on page 2 for the current ranges.
9. Open the Screw Valve on the TIG Torch handle to the desired gas flux value.
TIG Torch Handle
Screw Valve
Tip Accessories
REV 11/04; 09/05; REV 07/06
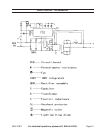
Power Indicator (5)
Welding Indicator (6)
Power Switch (3)
Overheat Indicator (7)
Argon Gas Outlet (10)
TIG Torch or Arc Electrode
Holder - Quick Coupler (8)
TIG Torch Cable Plug or Arc
Electrode Holder Cable Plug
Workpiece Ground
Cable Clamp -
Quick Coupler (8)
Grounding Clamp/Cable (54)
Current Adjustment
Potentiometer (4)
Gas Outlet Hose
Argon Gas Inlet (49) at
opposite end of unit.