


SKU 91811 For technical questions, please call 1-800-444-3353. Page 11
10. When everything is in place for welding, press the Power Switch to the On position.
Caution: Be careful not to touch anything else with the welding rod except the work-
piece.
11. Orient yourself on the area to be welded, then hold the Arc Shaded Face Shield over
your eyes, then strike the metal to begin welding.
Warning: Never look at the ignited arc without ANSI approved, arc shaded, eye protec-
tion in a full face shield. Permanent eye damage or blindness can occur. Skin burns can
occur. Never breath arc fumes.
Never tap the electrode wire into the welding surface to ignite the arc. This damages
its external coating on the electrode which prevents oxygen in the air from coming into
contact with the molten metal, causing it to oxidize.
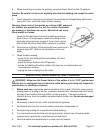
12. Once the arc is ignited, tilt the electrode wire forward at an angle of about 35°. Refer to
the illustration on the next page.
13. When finished welding;
- slowly lift the TIG Torch handle from the workpiece,
- press the Power Switch to the Off position,
- set the TIG Torch handle down on a nonflammable and nonconductive surface,
- turn the Argon gas supply off,
- Unplug the line cord plug from the outlet.
Note: If too much current is drawn from the welder, the Thermal Overload protector will acti-
vate, the red Overload indicator will light, and the welder will turn off until it cools down. It will
automatically reset.
Arc Welding
Before beginning, please read and understand the section “Specific Safety Rules” as
described on pages 5, 6, and 7.
1. Place the Welder near the workpiece to be welded.
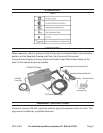
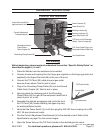
2. Connect the Arc Welding Electrode Holder (53) to the Arc Welding cable Quick
Coupler (8). Twist to lock in place. Refer to the photo of the Controls and Indicators on
the previous page.
3. Plug in the Grounding Clamp/Cable (54) into the Ground Cable Quick Coupler (8).
Twist to lock in place.
4. Securely place the clamping end of the Grounding Clamp/Cable (54) to a part of the
workpiece metal that is clean of paint, oil, or dirt.
5. Place the metal portion of the welding rod inside the jaws of the Arc Welding Electrode
Holder (53). Welding rod types vary for welding different metals.
6. Verify that the Power Switch (3) is off, then plug the 220 VAC line cord plug into a 220
VAC, 20 amp (minimum) outlet.
7. Turn the Current Adjustment Potentiometer (4) to the desired current. Refer to the
Specifications on page 2 for the current ranges.