


Installation Instructions CTA-111
5
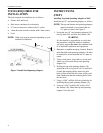
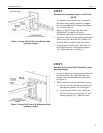
Figure 3. Attach Chief Wall Arm to Bottom Stud
Spanning Adapter
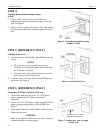
Figure 4. Attach Wall Arm to Wall-Mounted Stud
Spanning Adapter
STEP 2
Attaching Stud Spanning Adapter to Wall Arm
NOTE
To minimize error, the wall arm is attached to
the bottom stud-spanning adapter (10) before
the wall arm and bottom stud-spanning adapter
are secured to the wall.
Refer to CTA-025 Single Stud Wall Arm
(8809-000027) document for specific
installation instructions to mount the wall arm.
1. Locate the wall arm and its attaching parts [three
M8 hex nuts (60), three M8 lock washers (50),
and three M8 flat washers (40)]. See Figure 3.
2. Using the parts listed in step 1, attach the wall
arm to the bottom 16” stud-spanning adapter
(10). Tighten hex nuts. See Figure 3.
STEP 3
Attaching Wall Arm to Wall-Mounted Top Stud
Spanning Adapter
1. Locate the following attaching parts for the wall
arm [three M8 hex nuts (60), three M8 lock
washers (50), and three M8 flat washers (40)].
See Figure 4.
2. With an assistant, perform the following steps:
a. Lift wall arm onto the top wall-mounted 16”
stud-spanning adapter (10). See Figure 4.
b. Using the parts listed in step 1, attach the
wall arm to the top wall-mounted 16” stud-
spanning adapter (10). Tighten hex nuts.