


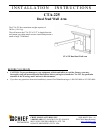


Installation Instructions CTA-225
3
IMPORTANT WARNINGS and CAUTIONS!
WARNING
A WARNING alerts you to the possibility of serious injury or death if you do not follow the
instructions.
CAUTION
A CAUTION alerts you to the possibility of damage or destruction of equipment if you do not follow
the corresponding instructions.
WARNING
Improper installation can result in serious personal injury! Make sure that the mounting surface
can support a redundant weight factor five times the total weight of the equipment: if not,
reinforce the mounting surface structural members before installing the mount.
WARNING
Be aware of the potential for personal injury or damage to the equipment if it is not adequately
mounted.
WARNING
The installer is responsible for verifying that the mounting surface to which the CTA-111 is
anchored will safely support the combined load of all attached components or other equipment.
WARNING
The combined weight of the TV/monitor and all attached components and equipment placed on a
Chief Wall Arm must not exceed 300 lbs. (136.1 kg), the maximum support weight of the CTA-225.
WARNING Watch for pinch points. Do not put your fingers between movable parts.
CAUTION
Check the unit for shipping damage before you begin the installation.
CONTENTS
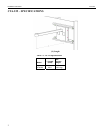
CTA-225 – SPECIFICATIONS........................................2
CONTENTS......................................................................3
INSPECT THE UNIT BEFORE INSTALLING ..............3
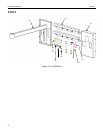
PARTS ..............................................................................4
TOOLS REQUIRED FOR INSTALLATION..................5
INSTRUCTIONS..............................................................5
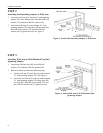
Installing Top Stud Spanning Adapter to Wall .............5
Attaching Stud Spanning Adapter to Wall Arm............6
Attaching Wall Arm to Wall-Mounted Top Stud
Spanning Adapter..........................................................6
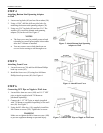
Attaching Bottom Stud Spanning Adapter to Wall .......7
Attaching Front Cover...................................................7
Connecting NPT Pipe or Nipple to Wall Arm...............7
INSPECT THE UNIT BEFORE
INSTALLING
Unpack the carton. Carefully inspect the parts for
shipping damage. Verify contents listed in Table 2.
If you are missing any of the listed parts, contact
Customer Service at: 1-800/582-6480.300.
Table 2. Shipping Contents
ITEM
DESCRIPTION
QTY
10 Wall Arm 1
20 16” Spanning adapter 2
30 Front Cover 1
40 5/16 X 2.5” Lag Bolt 4
50 5/16 Flat Washer 4
60 M8 Flat Washer 6
70 M8 Lock Washer 6
80 M8 Hex Nut 6
90 M4 X 8mm Phillips Head Cap Screw 4
100 M6 X 6mm Set Screw 1
110 M3 Allen Key (not shown) 1