


6
Cisco Aironet Four-Element, MIMO, Dual-Band Ceiling Mount Omnidirectional Antenna (AIR-ANT2524V4C-R)
78-20577-01
Choosing a Mounting Location
–
A wire mesh spaced between 1 and 1 1/2 in. (2.54- and 3.81-cm) acts as a harmonic reflector
that blocks a 2.4-Ghz radio signal.
• Install the antenna away from microwave ovens and 2-GHz cordless phones. These products can
cause signal interference because they operate in the same frequency range as the device to which
your antenna is connected.
• Install the antenna horizontally to maximize signal propagation.
Choosing a Mounting Location
The antenna should be mounted clear of any obstructions to the sides of the radiating elements.
Generally, the higher an antenna is above the floor, the better it performs. If possible, mount the antenna
on the ceiling panel within 12 in. (30.5-cm) of the access point so you can connect its cables directly to
the access point. If you must mount the antenna farther away from the access point, try to make the
distance as short as possible.
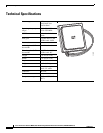
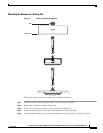
Installing the Antenna
You can install the antenna on a ceiling tile having a thickness between ½ in. (1.27-cm) and 1 in.
(2.54-cm).
Tools and Equipment Required
You need the following tools and equipment, which are not provided.
• A suitable hole cutter capable of creating a 1-in. (2.54-cm) hole in a suspended ceiling tile.
Note We recommend a hole saw, which is available in most home improvement centers and hardware
stores.
• A step ladder high enough to access your ceiling safely.
Installing the Antenna
The antenna is installed to a suspended ceiling tile with a supplied 1 in. (2.54-cm) plastic nut. See
Figure 1 for details.
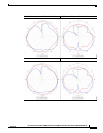
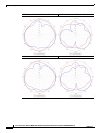
The antenna cables terminate with a straight RP-TNC plug connector after a 36 in. (91.44-cm) cable.
The mating connector to the antenna on the access point is an RP-TNC jack.