


RULES FOR SAFE OPERATION (Continued)
• Do not expose to rain or snow.
• To reduce the risk of damage to charger body
and cord, pull by charger body rather than cord
when disconnecting charger.
An extension cord should not be used unless
absolutely necessary. Use of improper
extension cord could result in a risk of fire and
electric shock. If extension cord must be used,
make sure:
• DO NOT OPERATE CHARGER WITH A
DAMAGED CORD OR PLUG. If damaged, have
replaced immediately by a qualified serviceman.
• Do not operate charger if it has received a sharp
blow, been dropped, or otherwise damaged in
any way; take it to a qualified serviceman.
a. That pins on plug of extension cord are the
same number, size and shape as those of •
plug on charger.
b. That extension cord is properly wired and in
good electrical condition; and
c. That wire size is large enough for AC ampere •
rating of charger as specified below: •
Cord Length (Feet) 25ft. 50ft. 100ft. 150ft.
Cord Size (AWG) 16 16 16 14
Note: AWG = American Wire Gage
Do not disassemble charger; take it to a qualified
serviceman when service or repair is required.
Incorrect reassembly may result in a risk of
electric shock or fire.
To reduce the risk of electric shock, unplug
charger from outlet before attempting any
maintenance or cleaning. Turning off controls will
not reduce this risk.
Do not use charger outdoors.
Disconnect charger from power supply when not in
use,
SAVE THESE INSTRUCTIONS. Review them
frequently and use them to instruct others who
may use this light. If you loan someone this light,
loan them these instructions also.
CHARGING YOUR WORKLIGHT
The battery pack and charger are not included with
this worklight. They are both sold separately• If you
decide to purchase a battery pack and charger, use
battery pack part number 975284-001 and charger
part number 975283-001.
TO CHARGE BATrERY PACK:
• Charge battery pack only with the charger recom-
mended•
• Make sure power supply is normal house
voltage, 120 volts, 68 hz, AC only.
• Connect charger to power supply.
• Place battery pack in charger then press down on
battery pack to be sure contacts on battery pack
engage properly with charger contacts•
• Red light should turn on.
• When battery pack is fully charged, the red light
will turn off and the green light will turn on.
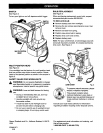
TO INSTALL/REMOVE BATTERY PACK
See Figure 1.
• Use 18.0 volt battery pack part number 975284-001
only.
• Begin with a fully charged battery pack.
Note: After normal usage, the battery pack
requires 1 hour of recharge time.
• Orient battery pack so that raised rib on battery
pack aligns with groove inside worklight. Battery
pack is designed to fit only one way in light
handle•
• Insert battery pack, making sure latches on each
side of battery pack snap in place and battery
pack is secure in light before use.
• _ CAUTION: When placing battery pack in your
light, be sure raised rib on battery pack aligns
with groove inside light handle and latches snap
in place properly. Improper assembly of battery
pack can cause damage to internal components.
• To remove battery pack, locate latches on end of
battery pack and depress to release battery pack
from your light.
BATTERY
2
DEPRESSLATCHESTO
RELEASEBATTERYPACK
Fig. 1