


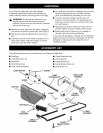
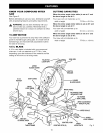
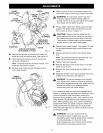
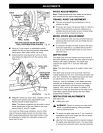

LOWER
BLADEGUARD
BLADE
BOLTCOVER
ARROW
PHILLIPS
SCREW
TO
LOOSEN
FLAT(S)
ONSPINDLE
TO
INNERBLADE
WASHERWITH
DOUBLE"D"FLATS
BLADEBOLT BLADE
OUTERBLADEWASHER
WITHDOUBLE"D"FLATS Fig. ll
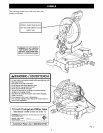
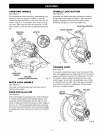
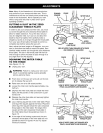
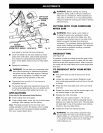
• Depress the spindle lock button and rotate the
blade bolt until the spindle locks. See Figure 12.
• Using the blade wrench provided, loosen and
remove the blade bolt.
Note: The blade bolt has left hand threads. Turn
blade bolt clockwise to loosen.
Remove outer blade washer. Do not remove
inner blade washer.
SPINDLE
LOCKBUTTON
Fig. 12
• Wipe a drop of oil onto inner blade washer and
outer blade washer where they contact the blade.
A
WARNING: If inner blade washer has been
removed, replace it before placing blade on
spindle. Failure to do so could cause an accident
since blade will not tighten properly.
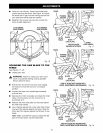
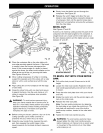
• Fit saw blade inside lower blade guard and onto
spindle. The blade teeth point downward at the
front of saw as shown in figure 11.
A
CAUTION: Always install the blade with the
blade teeth and the arrow printed on the side of
the blade pointing down at the front of the saw.
The direction of blade rotation is also stamped
with an arrow on the upper blade guard.
• Replace outer blade washer. The double "D" flats
on the blade washers align with the flats on the
spindle.
• Depress spindle lock button and replace blade
bolt.
Note: The blade bolt has left hand threads. Turn
blade bolt counterclockwise to tighten.
• Tighten blade bolt securely.
• Remove the blade wrench and store it in a safe
place for future use.
• Replace the lower blade guard and blade bolt
cover.
• Retighten phillips screw securing blade bolt cover.
Tighten screw securely. See Figure 11.
A
WARNING: To prevent damage to the spindle
lock, always allow motor to come to a complete
stop before engaging spindle lock. Make sure the
spindle lock button is not engaged before
reconnecting saw into power source.
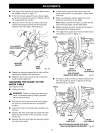
Your compound miter saw has been adjusted at the
factory for making very accurate cuts. However, some
of the components might have been jarred out of
alignment during shipping. Also, over a period of time,
readjustment will probably become necessary due to
wear. After unpacking your saw, check the following
adjustments before you begin using saw. Make any
readjustments that are necessary and periodically
check the parts alignment to make sure that your saw
is cutting accurately.
WARNING: Your saw should never be
connected to power supply when you are
assembling parts, making adjustments, installing
or removing blades, or when not in use.
Disconnecting your saw will prevent accidental
starting that could cause serious injury.
14