


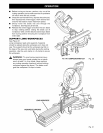

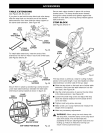


TABLE EXTENSIONS
See Figures 38, 39, and 40.
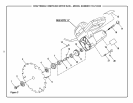
If you plan to use both the stop block and miter clamp,
slide the stop block on the back arm of the desired
table extension first. Next slide the clamp support on
the same table extension. See Figure 38.
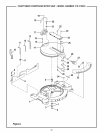
STOP
BLOCK
SMALL
WINGSCREW
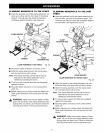
Secure each clamp bracket in place with a clamp
bracket screw. The clamp bracket screw threads
through the clamp bracket and tightens against the
bottom of miter table, securing clamp bracket against
table extension.
STOP BLOCK
See Figures 38 and 41.
CLAMP
SUPPORT
MITER
SAWBASE
Fig. 38
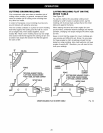
To install table extensions, insert the ends of the
extensions into the two holes in each side of the base.
See Figures 38 and 39.
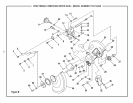
STOP
BLOCK
TABLE
EXTENSION
MITER
SAWBASE Fig. 39
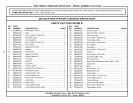
Secure them in place by positioning a clamp bracket
under each table extension beneath the miter table.
Orient each clamp bracket as shown in figure 40.
CLAMP
TABLE BRACKET
EXTENSION
CLAMP
BRACKETSCREW
SAWVIEWEDFROMBELOW
Fig. 40
The stop block is useful as a stop for cutting multiple
pieces to the same length. It can be installed on either
table extension on either side of the saw base:
• Slide the stop block on the back arm of either table
extension, then insert the table extension into the
saw base. See Figure 38.
• Use the small wing screw to secure the stop block
to the table extension. See Figure 38.
• Loosen the small wing screw and adjust the stop
block the desired distance from the blade for the
cut to be made.
• Tighten small wing screw securely.
• Make a test cut in scrap material and measure the
length of the workpiece.
• Make any necessary adjustments.
_t, WARNING: When using the work clamp with
the stop block, install the clamp on the stop block
side of the blade. This will eliminate the
possibility of the saw catching the loose end and
kicking up. Failure to heed this warning can
result in serious personal injury.
29