


:. ,:;.:
_, WARNING: Always wear safety goggles or
safety glasses with side shields when operating
tools. Failure to do so could result inobjects
being thrown into your eyes, resulting in possible
serious injury.
_IL WARNING: Do not allow familiarity with your
drill-driver to make you careless. Remember that
a careless fraction of a second issufficient to
inflict severe injury.
CHARGING BATTERY PACK
The battery pack for this tool has been shipped in a
low charge condition to prevent possible problems.
Therefore, you should charge itat least 3 to 5 hours
prior to use.
Note: Batteries will not reach full charge the first time
they are charged. Allow several cycles (drilling
followed by recharging) for them to become fully
charged.
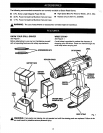
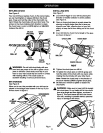
TO CHARGE
• Charge battery pack only with the charger and
charging stand provided.
• Make sure power supply Is normal house
voltage, 120 volts, 60 Hz, AC only.
• Connect charger to power supply.
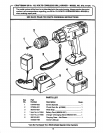
• Place battery pack in charging stand. Align raised
db on battery pack with groove in charging stand.
See Figure 1.
• Press down on battery pack to be sure contacts on
battery pack engage properly with contacts in
charging stand.
• When property connected, the red light on
charging stand will turn on.
• Note: If charger does not charge battery pack, retum
battery pack, charger and charging stand to your
nearest Sears Repair Center for electricalcheck.
• After normal usage, 3 hours of charging time is
required to be fully charged. A minimum charge
time of 3 to 5 hours is required to recharge a
completely discharged tool.
• The battery pack will become slightlywarm to the
touch while charging. This is normal and does not
indicate a problem.
• Do not place charger in an area of extreme heat
or cold. It will work best at normal room
temperature.
• When batteries become fully charged, unplug
charger from power supply.
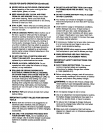
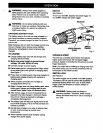
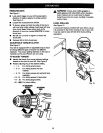
SWITCH
See Figure2.
ToturnyourdrillON, depressthe switchtrigger.To
turnit OFF, releasethe switchtrigger.
SE_C_R
CENTERPosmoN
(LOCK)
SWRCH
TR_GER
Fig. 2
VARIABLE SPEED
This tool has a variable speed switch that delivers
higher speed and torque with increased trigger
pressure. Speed is controlled by the amount of switch
trigger depression.
Note: You might hear a whistling or ringing noise from
the switch during use. Do not be concemed, this is a
normal part of the switch function.
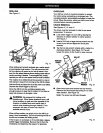
SWITCH LOCK
See Figure 2.
The switch trigger can be locked in the OFF position.
This feature can be used to prevent the possibility of
accidental starting when not in use. To lock switch
trigger, place the direction of rotation selector in
center position.
_i, WARNING: Battery tools are always in
operating condition. Therefore, switch should
always be locked when not in use or carrying at
your side.
7