


OPERATION
4.1 Charging the battery
4.1.1 If using the motor speed controller inhibit, and a Curtis motor controller
is present, connect the Motor Controller Inhibit connector to the
appropriate connector on the motor speed controller.
4.1.2
Connect the (–) terminal of the charger to the (–) terminal of the battery.
4.1.3
Connect the (+) terminal of the charger to the (+) terminal of the battery.
4.1.4 Plug the charger into an appropriate AC power source.
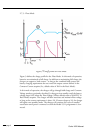
4.1.5
Charging is complete when a steady green indicator light is seen next to the
battery symbol on the charger. Unplug the charger from the wall and
disconnect the charger from the battery, removing the connection to the (+)
terminal first.
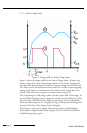
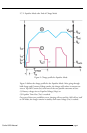
4.2 Programming Options
Curtis chargers do not use the 1311’s Monitor, Faults, or Functions Menus. The
Information and Programmer Setup Menus operate as described in the 1311’s
instruction manual with the exception of the Serial Number submenu in the
Information Menu – this field is filled with a default value of 12345678.
The 1620 offers two levels of programmability, Basic and Advanced. The pro-
gram features are accessed by connecting a Curtis Model 1311 handheld pro-
grammer to the Programming port. Programming in Basic Mode involves setting
battery type (Flooded or Sealed Lead-Acid) and End of Charge Mode (charge
profile), while Advanced Mode offers flexibility of changing the most important
parameters of the charger for optimum charging of almost any Lead-Acid based
battery. Of course, selecting the Factory Default option restores the charger set-
tings to the default values it left the factory with. This option can be invoked at
any time.
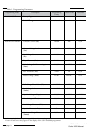
Variable parameters, limits, default settings, accuracy and descriptions are listed
in Table 1.
4.3 Programming the charger
Note 1: Connecting the Model 1311 handheld programmer to the charger will
cause the charger to enter standby mode while connected. The charger will reset
and resume normal operation upon removal of the 1311.
Note 2: The Model 1311 handheld programmer is available with different con-
nectors. Be sure to use a 1311 with the 4 pin Molex connector. Conact a Curtis
sales office for assistance.
4.3.1 Attach the programmer to the 4-pin Molex connector, between the
indicators. The yellow and green indicators will blink on and off
simultaneously, indicating that the charger is in programming mode.
4.3.2
Configure the programmable parameters defined in Section 4.2.
4.3.3
Once the programmable parameters have been defined, disconnect the
1311 programmer from the charger. The charger will reset and resume
normal operation.
Curtis 1620 Manual
page 8
4