


Copyright © 2011 CyberPower Systems, Inc.
HARDWARE INSTALLATION
2
HARDWARE INSTALLATION
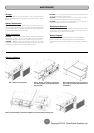
These versatile Battery modules can be mounted in a rackmount or
vertical /tower orientation. This versatility is especially important to
growing organizations with changing needs that value having the option
to position a Battery module on a floor or in a rackmount system. Please
follow the instructions below for the respective mounting methods.
SAFETY PRECAUTIONS
CAUTION! To prevent the risk of fire or electric shock, only use the
supplied hardware to attach the mounting brackets.
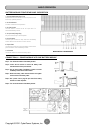
RACKMOUNT INSTALLATION
Step 1: Remove the internal battery trays from the Battery module
(See page 7)
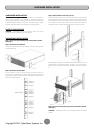
Step 2: Rackmount ears installation
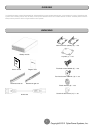
Attach the two rackmount ears to the Battery module using the provided
screws M5X8L*8pcs.
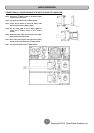
Step 3: Rackmount rail Installation
The rails adjust to mount in 48-cm (19-inch) panel racks from 52 to
91.5cm (20.5 to 36 inches) deep. Select the proper holes in the rack for
positioning the Battery module in the rack. The Battery module takes up
position 1 through position 9.
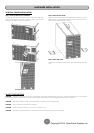
Step 4: Adjust rackmount rails to fit your rack
Attach the rackmount rail to your rack with two M5X12L screws and two
plastic washers at the front of the rack. (Located in position 1 & position 6)
Do not tighten the screws. Adjust the rail size on the rail assembly of your
rack. Secure the rail to the rear of the rack with two M5X12L screws and
two plastic washers. Tighten all screws at the front and rear of the rail.
Place the Battery module on a flat stable surface with the front of the unit
facing toward you. Secure the Battery module to your rack with four
M5X12L screws at the front of the rack. (Located in position 2 & position
8)
Step 5: Place the internal battery trays back into the Battery module
(See page 7)
CAUTION! The Battery module must be installed below the power
module.