


10 — ENG
Air Filter - Inspection and Replacement
Keep the air filter clean at all times. Do not operate the
compressor with the air filter removed.
A dirty air filter will not allow the compressor to operate at full
capacity. Before you use the compressor, check the air filter to
be sure it is clean.
If it is dirty, simply pull it out. You may wash it with a mild
detergent and warm water, or replace it.
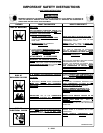
Safety Valve - Inspection
IF THE SAFETY VALVE DOES NOT WORK PROP-
ERLY, OVER-PRESSURIZATION MAY OCCUR,
CAUSING AIR TANK RUPTURE OR AN EXPLO-
SION. DAILY PULL THE RING ON THE SAFETY
VALVE TO MAKE SURE THAT THE SAFETY
VALVE OPERATES FREELY. IF THE VALVE IS
STUCK OR DOES NOT OPERATE SMOOTHLY,
IT MUST BE REPLACED WITH THE SAME TYPE
OF VALVE.
Motor
The motor has an automatic reset thermal overload protector.
If the motor overheats for any reason, the overload protector will
shut off the motor. The motor must be allowed to cool down
before restarting. The compressor will automatically restart
after the motor cools.
If the overload protector shuts the motor off frequently, check
for a possible voltage problem. Low voltage can also be
suspected when:
1. The motor does not get up to full power or speed.
2. Fuses blow out when starting the motor; lights dim and
remain dim when motor is started and/or is running.
SERVICE INSTRUCTIONS
Filter
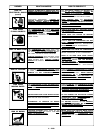
Hot surfaces. Risk of burn. Compressor heads
are exposed when filter cover is removed. Allow
compressor to cool prior to servicing.
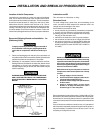
Units With External Brass Check Valve Replacement
1. Release all air pressure from air tank and disconnect power
from outfit.
2. Remove shroud.
3. Loosen the top and bottom nuts and remove the outlet
tube.
4. Remove the pressure release tube and fitting.
5. Unscrew the check valve (turn counterclockwise) using a
socket wrench.
6. Check that the valve disc moves freely inside the check
valve and that the spring holds the disc in the upper, closed
position. The check valve may be cleaned with a strong
solvent.
7. Apply sealant to the check valve threads. Reinstall the
check valve (turn clockwise).
8. Replace the pressure release tube and fitting.
9. Replace the outlet tube and tighten top and bottom nuts.
10. Replace the shroud.
UNIT CYCLES AUTOMATICALLY WHEN POWER IS ON. WHEN DOING MAINTENANCE, YOU MAY BE EXPOSED TO
VOLTAGE SOURCES, COMPRESSED AIR OR MOVING PARTS. PERSONAL INJURIES CAN OCCUR. BEFORE PERFORM-
ING ANY MAINTENANCE OR REPAIR, DISCONNECT POWER SOURCE FROM THE COMPRESSOR AND BLEED OFF ALL
AIR PRESSURE.
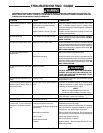
Daily:
1. Drain water from the air tank, any moisture separators
or transformers.
2. Check for any unusual noise and/or vibration.
3. Manually check safety valve to make sure of proper opera-
tion.
4. Inspect air filter, replace if necessary.
5. Inspect air lines and fittings for leaks; correct as
necessary.
Each Year of Operation or if a Problem is Suspected:
Check condition of air compressor pump intake and exhaust
valves. Replace if damaged or worn out.
To ensure efficient operation and longer life of the air compressor outfit, a routine maintenance schedule should be prepared
and followed. The following routine maintenance schedule is geared to an outfit in a normal working environment operating on
a daily basis. If necessary, the schedule should be modified to suit the conditions under which your compressor is used. The
modifications will depend upon the hours of operation and the working environment. Compressor outfits in an extremely dirty
and/or hostile environment will require a greater frequency of all maintenance checks.
MAINTENANCE
ALL MAINTENANCE AND REPAIR OPERATIONS NOT LISTED MUST BE DONE BY
QUALIFIED SERVICE PERSONNEL.
ROUTINE MAINTENANCE SCHEDULE