


13
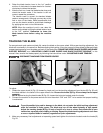
4. Raise the blade tension lever to the “up” position
and turn it clockwise to increase tension or counter-
clockwise to relieve the tension.
5. After the first turn, lower the blade tension lever and
check the tension scale. If the tension is still not
correct, repeat the procedure.
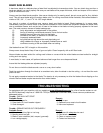
The tension scale is correct for standard blades
used on average work. Although you may rely on the
feel or tone of the blade, Delta recommends that
you use the tension scale to avoid blade breakage
by applying too much or too little tension.
NOTE: When the machine is not in use, relax the
tension on the blade by lifting the blade tension lever
to the “UP” position. Remember to lower the
blade tension lever before using the machine
again.
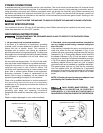
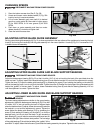
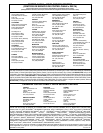
Fig. 18
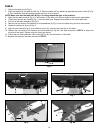
TRACKING THE BLADE
For accurate work and maximum blade life, center the blade on the upper wheel. With proper tracking adjustment, the
blade will run steadily in the same line. Before adjusting the tracking, move the upper and lower blade guides and blade
support bearings away from the sides and back of the blade (See “ADJUSTING UPPER BLADE GUIDES AND BLADE
SUPPORT BEARING” and “ADJUSTING LOWER BLADE GUIDES AND BLADE SUPPORT BEARING” in this
manual. Also, tension the blade properly by following the instructions under “ADJUSTING BLADE TENSION”.
DISCONNECT MACHINE FROM POWER SOURCE.
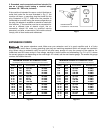
Fig. 19
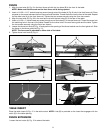
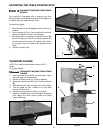
To adjust:
1. Rotate the upper wheel (A) Fig. 19 forward by hand and turn the tracking adjustment hand knobs (B) Fig. 20 until
the blade travels in the center of the upper wheel’s tire. Be sure the knobs (B) Fig. 20 are always turned equal
amounts.
NOTE: Before turning the hand knobs (B) Fig. 20, loosen the locknuts located under the knobs.
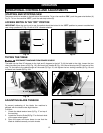
2. Connect the machine to the power source and turn the switch “ON” and “OFF” to be certain that proper tracking
is maintained.
To avoid possible injury and/or damage to the blade, do not make the initial tracking adjustment
while the machine is under power. The blade may run off the wheel instantly at high speed.
Adjust the tracking knobs (B) Fig. 20 only a fraction of a turn at a time. Each blade has its own
tendencies, especially after welding or brazing. Repeat the blade tracking adjustment each time
a new or repaired blade is installed, regardless of prior adjustments.
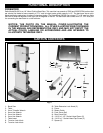
Fig. 20
3. Make any necessary final adjustments at operating speed and tighten the locknuts located under the knobs (B)
Fig. 20.
A
B