


2
center. Do not use tool if switch does not turn it on and off.
• CAUTION: When drilling or driving into walls, floors or wherever
live electrical wires may be encountered, DO NOT TOUCH ANY
METAL PARTS OF THE TOOL! Hold the tool only by insulated
grasping surfaces to prevent electric shock if you drill or drive into a
live wire.
SAVE THESE INSTRUCTIONS
Motor Brushes
DEWALT uses an advanced brush system which automatically stops
the drill when the brushes wear out. This prevents serious damage to
the motor.
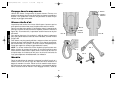
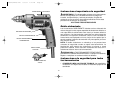
Switches
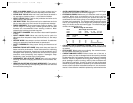
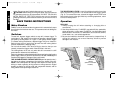
To start drill, depress trigger switch; to stop drill, release trigger. To
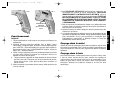
lock trigger in “ON” position for continuous operation, depress trigger
and push up locking button “A” Figure 1, then gently release trigger.
To release locking mechanism, depress trigger fully, then release it.
Before using the tool (each time) be sure that the locking button
release mechanism is working freely.
Do not lock the switch “ON” when drilling by hand so that you can
instantly release the trigger switch if the bit binds in the hole.
The locking button is for use only when the drill is mounted in a drill
press stand or otherwise held stationary.
Be sure to release the locking button before disconnecting the plug from the
power supply. Failure to do so will cause the tool to start immediately the
next time it is plugged in. Damage or injury could result.
THE VARIABLE SPEED TRIGGER SWITCH permits speed control –
the farther the trigger is depressed, the higher the speed of the drill.
NOTE: Use lower speeds for starting holes without a center punch,
drilling in metal or plastics, driving screws or drilling ceramics. Higher
speeds are better for drilling wood and composition boards, and for
using abrasive and polishing accessories.
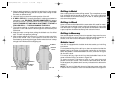
THE REVERSING LEVER is used for withdrawing bits from tight
holes and removing screws. It is located above the trigger switch
(Fig. 2). To reverse the motor, release the trigger switch FIRST and
then push the lever to the right. After any reversing operations, return
lever to forward position.
Operation
DRILLING
1. Always unplug the drill when attaching or changing bits or
accessories.
2. Use sharp drill bits only. For WOOD, use twist drill bits, spade bits,
power auger bits, or hole saws. For METAL, use high speed steel
twist drill bits or hole saws. For MASONRY, such as brick, cement,
cinder block, etc., use carbide-tipped bits.
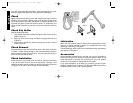
3. Be sure the material to be drilled is anchored or clamped firmly. If
drilling thin material, use a wood “back-up” block to prevent
damage to the material.
English
FIG. 1
A
FIG. 2
REVERSING
LEVER
(Shown in Forward
Position)
383945/DW100-220 5/3/02 1:15 PM Page 2