


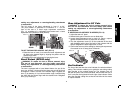

English
11
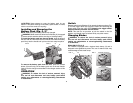
To Install the Blade:
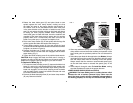
1. Place inner clamp washer (O) on saw spindle with the large flat
surface facing out toward the blade (Fig. 4).
2. Retract the lower blade guard (G) and place blade on saw spindle
against the inner clamp washer, making sure that the blade will
rotate in the proper direction (the direction of the rotation arrow
on the saw blade and the teeth must point in the same direction
as the direction of rotation arrow on the lower guard). Do not
assume that the printing on the blade will always be facing you
when properly installed. When retracting the lower blade guard
to install the blade, check the condition and operation of the
lower blade guard to assure that it is working properly. Make
sure it moves freely and does not touch the blade or any other
part, in all angles and depths of cut.
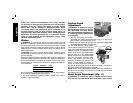
3. Place outer clamp washer (P) on saw spindle with the large flat
surface against the blade and the side with ratchet teeth facing
out.
4. Thread the keyless blade clamp (H) into saw spindle by
hand (clamp has left-hand threads and must be turned
counterclockwise to tighten, as shown in Figure 5).
5. Depress the blade lock button (L) while turning the saw spindle
by hand until the blade lock engages and the blade stops
rotating.
6. Extend the lever on the keyless blade clamp (H) and hand
tighten firmly (Fig. 5).
CAUTION: Never engage the blade lock while saw is running or
engage in an effort to stop the tool. Never turn the saw on while the
blade lock is engaged. Serious damage to your saw will result.
To Replace the Blade (Fig. 4):
1. Depress the blade lock button (L) and turn the saw spindle
until the blade lock engages and the blade stops rotating. With
the blade lock engaged, extend the lever on the keyless blade
clamp and turn clockwise (clamp has left-hand threads and
must be turned clockwise to loosen, as shown in Figure 5).
2. Remove the keyless blade clamp (H) and outer clamp washer
(P) only. Remove old blade.
3. Clean any sawdust that may have accumulated in the guard or
clamp washer area and check the condition and operation of the
lower blade guard as previously outlined. Do not lubricate this
area.
4. Select the proper blade for the application (see Blades). Always
use blades that are the correct size (diameter) with the proper size
and shape center hole for mounting on the saw spindle. Always
assure that the maximum recommended speed (rpm) on the saw
blade meets or exceeds the speed (rpm) of the saw.
5. Follow steps 2 through 6 under To Install the Blade, making
sure that the blade will rotate in the proper direction.
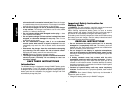
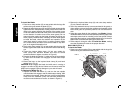
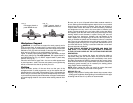
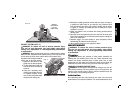
DC310 ONLY (FIG. 6, 7)
To Install the Blade:
1. Place inner clamp washer (Q) on saw spindle with the large flat
surface facing out toward the blade (Fig. 6).
Q
R
S
FIG. 6
G
F
L
J