


ENGLISH
10
CAUTION: Wear work gloves when
handling wire brushes and wheels.
They can become sharp.
CAUTION: Wheel or brush must not
touch guard when mounted or while
in use. Undetectable damage could
occur to the accessory, causing wires to
fragment from accessory wheel or cup.
1. Thread the wheel on the spindle by hand.
2. Depress spindle lock button and use a wrench
on the hub of the wire wheel or brush to tighten
the wheel.
3. To remove the wheel, reverse the above
procedure.
NOTICE: Failure to properly seat the
wheel hub before turning the tool on
may result in damage to tool or wheel.
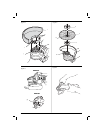
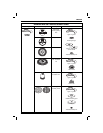
Fitting and Removing a
Backing pad/Sanding sheet (fi g. 1)
1. Place the tool on a table or flat surface, with the
guard facing up.
2. Remove the backing flange (d).
3. Place the rubber backing pad correctly onto the
spindle (b).
4. Place the sanding sheet on the rubber backing
pad.
5. Screw the threaded clamp nut (e) onto the
spindle. The ring on the threaded clamp nut
must face towards the rubber backing pad.
6. Press the spindle lock button (a) and rotate the
spindle (b) until it locks in position.
7. Tighten the threaded clamp nut (e) with the hex
key provided or a two pin spanner.
8. Release the spindle lock.
9. To remove the rubber backing pad, loosen
the threaded clamp nut (e) with the hex key
provided or a two pin spanner.
Fitting a Wire Cup Brush
Screw the wire cup brush directly onto the spindle
without the use of the spacer and threaded flange.
Prior to Operation
• Install the guard and appropriate disc or wheel.
Do not use excessively worn discs or wheels.
• Be sure the inner and outer flanges are
mounted correctly.
• Make sure the disc or wheel rotates in the
direction of the arrows on the accessory and
the tool.
OPERATION
Instructions for Use
WARNING: Always observe the safety
instructions and applicable regulations.
WARNING: To reduce the risk
of serious personal injury, turn
tool off and disconnect tool from
power source before making any
adjustments or removing/installing
attachments or accessories. Before
reconnecting the tool, depress and
release the trigger switch to ensure that
the tool is off.
WARNING:
• Ensure all materials to be ground or
cut are secured in place.
• Secure and support the workpiece.
Use clamps or a vice to hold and
support the workpiece to a stable
platform. It is important to clamp and
support the workpiece securely to
prevent movement of the workpiece
and loss of control. Movement of
the workpiece or loss of control may
create a hazard and cause personal
injury.
• Apply only a gentle pressure to the
tool. Do not exert side pressure on the
disc.
• Avoid overloading. Should the tool
become hot, let it run a few minutes
under no load condition.
Proper Hand Position (fi g. 1, 6)
WARNING: To reduce the risk of
serious personal injury, ALWAYS use
proper hand position as shown.
WARNING: To reduce the risk of
serious personal injury, ALWAYS hold
securely in anticipation of a sudden
reaction.
Proper hand position requires one hand on the side
handle (c), with the other hand on the body of the
tool, as shown in figure 1.
Switches
CAUTION: Hold the side handle and
body of the tool firmly to maintain
control of the tool at start up and during