


English
7
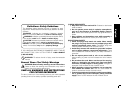
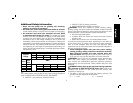
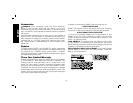
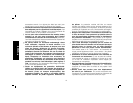
A
FIG. 1
B
D
C
E
F
COMPONENTS (Fig. 1)
WARNING: Never modify the power tool or any part of it. Damage
or personal injury could result.
A. Main handle D. Dust port
B. Side handle E. Speed control dial
C. Dust shroud F. Trigger switch
INTENDED USE
This sander is designed for professional sanding of solid suface
material such as wood, metal, fiberglass, plastics and paint.
DO NOT use under wet conditions or in presence of flammable
liquids or gases.
These heavy-duty sanders are professional power tools.
DO NOT let children come into contact with the tool. Supervision is
required when inexperienced operators use this tool.
ASSEMBLY AND ADJUSTMENTS
WARNING: To reduce the risk of injury, turn unit off
and disconnect it from power source before installing and
removing accessories, before adjusting or when making
repairs. An accidental start-up can cause injury.
Attaching Side Handle (Fig. 1)
The side handle (B) can be fitted to either side of the housing in
the threaded holes. Before using the tool, check that the handle is
tightened se cure ly.
This handle should be used at all times to maintain complete control
of the tool.
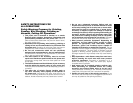
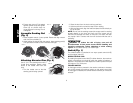
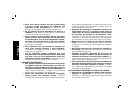
Assemble Dust Shroud (Fig. 2–4)
1. Loosen screw (G) on dust shroud
C
G
D
FIG. 2
(C). Do not remove screw or nut.
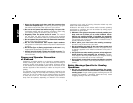
2. Slide dust shroud onto sander
body.
3. With the sander on a stable
surface, hold the dust shroud
(C) by the dust port (D) and
push this side of shroud over
the notches (H). Then work in a
circular motion and push the shroud over the remaining notches.
H
FIG. 3