


English
6
• Avoid prolonged contact with dust from power sanding,
sawing, grinding, drilling, and other construction activities.
Wear protective clothing and wash exposed areas with soap
and water. Allowing dust to get into your mouth, eyes, or lay on
the skin may promote absorption of harmful chemicals.
WARNING: Use of this tool can generate and/or disburse
dust, which may cause serious and permanent respiratory or
other injury. Always use NIOSH/OSHA approved respiratory
protection appropriate for the dust exposure. Direct particles
away from face and body.
• The label on your tool may include the following symbols. The
symbols and their definitions are as follows:
V ............ volts A .............amperes
Hz .......... hertz W ............watts
min ........ minutes
..........alternating current
..... direct current ..........alternating or direct
.......... Class I Construction ...............current
.............. (grounded)
n
o ...........no load speed
.......... Class II Construction ............ ear thing ter minal
.............. (double insulated) ...........safety alert symbol
BPM ...... beats per minute …/min .....per minute
RPM ...... revolutions per minute
SAVE THESE INSTRUCTIONS
Motor
Be sure your power supply agrees with nameplate marking. As little
as 10% lower voltage can cause loss of power and can result in
overheating. All D
EWALT tools are factory-tested; if this tool does
not operate, check the power supply.
WARNING: Accessories must be rated for at least the speed
recommended on the tool warning label. Accessories running over
rated speed can fly apart and cause injury. Accessory ratings must
always be above tool speed as shown on tool nameplate.
CAUTION: Avoid contact with the blade teeth to prevent
personal injury.
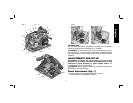
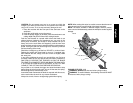
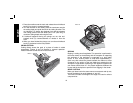
COMPONENTS (Fig. 1–3, 8)
WARNING: Never modify the power tool or any part of it.
Damage or personal injury could result.
A. Plunge trigger O. Outer flange
B. On/off switch P. Inner flange
C. Main handle Q. Riving knife
D. Shoe R. Riving knife adjustment screws
E. Bevel adjustment knob S. Speed wheel
F. Depth adjustment knobs T. Cutting indicator
G. Depth scale U. Anti-kickback knob
H. Front handle V. Outer guard
I. Dust extraction outlet W. Track
J. Track adjuster X. Bevel scale
K. Blade Y. Blade position indicators
L. Lock button Z. Hex wrench
M. Lock lever
N. Blade clamping screw