


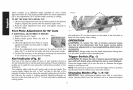
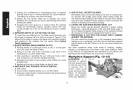

whichconsistsof a calibratedanglequadrant(I) anda bevel
adjustmentlever(H).Theanglequadrantallowsforcoarseadjustment
(N)orfineadjustment(O)toachievebetteraccuracyincutting.
TOSETTHESAWFORA BEVELCUT
1.Liftthebeveladjustmentlever(H)andtiltfootplatetothedesired
anglebyaligningthepointerwiththedesiredanglemark.
2.Pushthebeveladjustmentleverdownandtightensecurelyto
locktheangle.
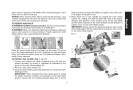
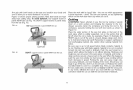
Foot Plate Adjustment for 90 ° Cuts
IF ADD,TIONAL ADJUSTMENT IS NEEDED
1. Adjust the saw to 0 ° bevel. FaG.7
2. Retract blade guard. Place the saw on
blade side.
3. Lift bevel adjustment lever. Place a square
against the blade and foot plate to adjust
the 90° setting.
4. Move the adjustment screw, located on the bottom of the foot
plate (Fig. 7), so that the foot plate will stop at the proper angle.
5. Confirm the accuracy of the setting by checking the squareness
of an actual cut on a scrap piece of material.
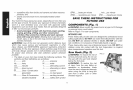
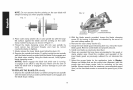
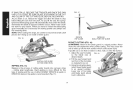
Kerr Indicator (Fig. 8)
The front of the saw foot plate (D) has a 0° ken' indicator (F) and a
45° ken' indicator (G) for vertical and bevel cutting.The kerf indicators
enable you to guide the saw along the cutting lines penciled on the
workpiece.
The indicator aligns with the left (outer) side of the saw blade. The
moving blade making the slot or "ken'" cut falls to the right of the
indicator. Position the saw along the penciled cutting line so that the
ken' falls into the waste or surplus material. Marking indicators on
the front of the foot plate are at 1/2" (13 mm) intervals for additional
cutting guides.
FIG. 8
G
F
Ken' indicators (P) are also located on the inside of the foot plate to
keep the saw square when cutting.
OPERATION
_&WARNING: To reduce the risk of serious personal injury,
turn tool off and disconnect tool from power source before
making any adjustments or removing/installing attachments or
accessories.
iMPORTANT: Always make sure the depth adjustment locking lever
is in the down position before operating saw.
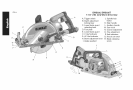
Trigger Switch (Fig. 1)
_ WARNING: To reduce the risk of serious personal injury, hold
saw with both hands when starting the saw to avoid kickback.
Press the trigger switch (A) to turn the tool on. Release the trigger
switch to turn the tool off.
NOTE: This tool has no provision to lock the trigger in the on position
and should never be locked on by any other means.
Changing Blades (Fig. 1, 9-12)
iMPORTANT: Most replacement blades come with a round arbor
center opening which must be knocked out so a diamond-shaped