


5
With any paint job you should always ensure that you have prepared your surface to get the best finish. You must ensure all surfaces are free from
dust, dirt, rust and grease. Lightly pressure wash decks or exterior surfaces and ensure they are dry before painting.
With pre-coated or pre-painted surfaces and lightly rub down with sandpaper to ensure a good key for the paint. With bare wood surfaces wipe with
a wet rag to ensure the surface is free of dust.
Even though HVLP has very little overspray it is recommended masking of edges and other areas and using a drop cloth to ensure you protect those
areas you wish to remain untouched.
Viscosity is a technical term used to indicate if a liquid is thin or thick. Having the correct viscosity of paint is important to ensure the paint atomizes
correctly and sprays well giving you a good quality finish. If your material is thin like water then the viscosity is said to be low, while if thick like latex
interior paint then viscosity is said to be high. Viscosity is measured in seconds.
You should always test the viscosity (or thickness) of paint before spraying to see if thinning is required. The correct viscosity is important to ensure
the paint atomizes correctly and sprays evenly.
Your Spray Station comes equipped with a viscosity cup The viscosity cup will help you determine the thickness of the paint. To test a liquids
viscosity, dip the viscosity cup into the material and fill up to the top. Time how long it takes for the paint to empty the viscosity cup - stop when the
continuous flow ends from the bottom of the cup. This will then determine if the material needs to be thinned before being sprayed.
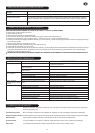
The Spray Station 3500 has a viscosity rating of 160 seconds. If the paint has emptied the viscosity cup in less than 160 seconds then you will not
need to thin your paint or material. If it is above this then thinning will be required. (see thinning section).
Paint is “thinned” by adding the substance upon which the paint is based. If it is water-based paint then water is added; if oil based then mineral spirit
or manufacturer’s recommended thinner. If the paint requires thinning, start with a 10% dilution of the paint. To do this, partially fill a container with
one quart of paint. The viscosity cup supplied with the unit holds 1/10 of a quart. Block the hole in the viscosity cup with your finger and fill up with the
required thinner. Add the thinner to the paint and stir, and re-measure the viscosity. If the paint requires additional thinning, repeat this step by adding
5% (5% will be equal to half a viscosity cup) with the required thinner until desired viscosity is achieved.
If mixing larger batches of paint, for instance a gallon then add four viscosity cups of appropriate thinner which is approximately 10% of a gallon. If
further thinning is required repeat by adding two viscosity cups (approx 5% of a gallon) until desired viscosity is achieved.
We would also recommend you follow the paint/coating manufacturer’s guide for thinning in conjunction with a spray gun. If in doubt please contact
the manufacturers of the paint.
As some paints, wood preservatives and other sprayable materials contain particles that have differing qualities or you may be using an old paint, we
recommend that you filter your material when filling the paint container of the spray gun or backpack, through either a funnel with a filter on it or
through hosiery. This will ensure that no large particles enter the paint container, so preventing blockages and providing you with trouble-free
spraying.
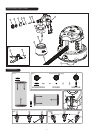
Fill the paint container (
12) with the material to be sprayed. DO NOT OVERFILL above the start of the threaded neck. Push the pick-up tube (11) firmly
into the base of the spray gun body. Screw the paint container onto the spray gun body tightly.
ALWAYS MAKE SURE THAT THE TURBINE IS ON A STABLE SURFACE AND FREE FROM DUST AND DEBRIS OR LIQUIDS.
Connect the hose (
13) to the back of the spray gun. Connect the power cord in to the electrical outlet. ALWAYS KEEP THE TURBINE AS FAR AWAY
FROM THE SPRAYING AREA AS POSSIBLE TO PREVENT PAINT CONTAMINATING THE MOTOR. MASK ANY AREA YOU DO NOT WISH TO
SPRAY.
Tip: If you are spraying a ceiling angle the pickup tube (11) to the rear of the container or if you are spraying a floor surface angle the pickup
tube to the front of the container. This will ensure you spray as much material as possible in the container before you need to refill
the container.
Uncoil the air hose and attach it to the back of the spray gun and the other end to the Spray Station.
Uncoil the power cable and plug in to the electrical outlet.
An airtight seal is essential for the correct operation of this spray gun. Before operating the unit please ensure that the paint container (
12) is securely
fixed to the spray gun body and the the gasket is in place.
Once you have set up and are ready to spray, turn the unit on. You will recognize the sound to be similar to that of a vacuum cleaner. Air will
continually flow through the front of the gun but no paint will be sprayed until the trigger on the spray gun is pulled.
SURFACE AND JOB PREPARATION
VISCOSITY & THINNING
THINNING
FILLING THE PAINT CONTAINER
OPERATION