


8
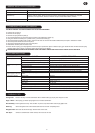
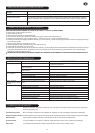
Needle fluid tip size Material sprayed
Small tip Acrylics, Synthetics, Polyurethane, Thinner, Lacquers, Fluorescent, Oil-Based Stains
Stain/latex tip Oil base, Hammer, Oxide, Primer, Air Drying, Enamel, Varnish, Marine Paint, Multi-Color, industrial
Synthetics, Oil, Polyurethane, Aluminum Thicker Lacquers, Water-Based Stains, Shellac
Large tip Chlorinated Rubber, Oxide, Zinc Rich Primer, Epoxy, Plastic Additives, Floor Paving Paint, Latex
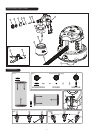
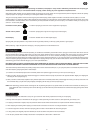
YOU MUST ENSURE YOU REPLACE BOTH THE FLUID TIP AND NEEDLE.
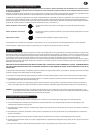
● Unscrew air cap ring (2).
● Remove the air cap (3).
● Remove the spray direction plate (4).
● It is recommended that you push the trigger forward to help release the fluid tip (5).
● Using the needle and fluid tip tool - pincher end A (1) remove the fluid tip (5).
● Insert the needle and fluid tip tool end B (1) into the inner tube and unscrew the needle anticlockwise, then pull to release the needle.
● Insert the optional needle and screw into place
● Insert the corresponding fluid tip and screw into place
● Reassemble all other parts in reverse order.
● Ensure the air cap ring (2) is fully tightened and the fluid tip is pushed into place so that the spray gun needle will shut off. Make sure the spray
direction plate is free to move. If necessary loosen the Air cap ring (2) slightly.
●●
NEVER DISPOSE OF PAINTS OR SOLVENTS DOWN THE DRAIN. ALWAYS USE YOUR LOCAL WASTE COLLECTION SITE.
PROBLEM CAUSE ACTION REQUIRED
The paint splatters Paint viscosity is too thick Thin as required using appropriate thinner (see thinning instructions).
A
n area inside the spray gun has a degree of blockage
C
lean gun and filter paint in the container.
Gun wasn’t correctly cleaned from previous project Clean Gun
The paint drips or sags on
surface
Paint viscosity is low/thin Add undiluted paint
Paint output too high Reduce the paint output by adjusting the paint flow adjuster (9)
Moving too slowly Increase speed of application
Spray Trigger held for too long Release Trigger sooner
Spray Gun too close Increase the distance between the spray gun and the work surface
I’m getting too much over-
spray or fogging in the room
Paint flow too high and spraying too close to the
surface
Reduce paint flow and move further from the surface.
Orange Peel: Reduce viscosity. Increase atomization with a smaller fluid tip (5). Spray area may be too cold.
Sags or Runs: Move spray gun faster. Spray lighter coat. Increase atomization.
Wet and Milky: Finish applied too heavy. This condition is prone to trap water within coats. Apply lighter coat.
Blushing: Seal coat applied over solvent-based stain that has not been completely dried.
Rough Surface: Seal coat not sanded enough. Sand smooth and re-coat.
Fish Eyes: Surface is contaminated. Clean surface, sand area and re-coat.
No paint being released Paint too thick Add thinner
Fluid tip blocked Clean the fluid tip (5)
Pick-up tube blocked Clean the gun
Air hose split Replace air hose (13)
Grainy paint Filter the paint
Paint container almost empty Refill paint container (12)
Spray gun at an angle Check that the pick-up tube (11) is pointing towards the paint
Air inlet blocked Check the condition of the filter (14) and clean if necessary
EXPLODED PARTS VIEW
SAFETY INSTRUCTIONS
WARNING! FIRE AND EXPLOSION HAZARD.
IMPORTANT ELECTRICAL INFORMATION
DOUBLE INSULATED APPLIANCE
I
MPORTANT: SELECTING PAINT
SURFACE AND JOB PREPARATION
VISCOSITY & THINNING
THINNING
F
ILLING THE PAINT CONTAINER
O
PERATION
STARTING TO SPRAY
TECHNIQUE
TROUBLESHOOTING
T
OP TIPS
CLEANING INSTRUCTIONS
P
ARTS LIST
SPRAY GUN
FLUID TIP AND NEEDLE
T
URBINE UNIT
AFTER USE
FLUID TIPS AND NEEDLES
NEEDLE SELECTION GUIDELINES
CHANGING THE TIP AND NEEDLE
TROUBLESHOOTING
FINISHING TIPS
SERVICING OF DOUBLE-INSULATED APPLIANCES
E
XPLODED PARTS VIEW
SAFETY INSTRUCTIONS
WARNING! FIRE AND EXPLOSION HAZARD.
I
MPORTANT ELECTRICAL INFORMATION
D
OUBLE INSULATED APPLIANCE
IMPORTANT: SELECTING PAINT
SURFACE AND JOB PREPARATION
VISCOSITY & THINNING
T
HINNING
FILLING THE PAINT CONTAINER
OPERATION
STARTING TO SPRAY
TECHNIQUE
T
ROUBLESHOOTING
TOP TIPS
C
LEANING INSTRUCTIONS
PARTS LIST
SPRAY GUN
FLUID TIP AND NEEDLE
TURBINE UNIT
AFTER USE
FLUID TIPS AND NEEDLES
NEEDLE SELECTION GUIDELINES
CHANGING THE TIP AND NEEDLE
TROUBLESHOOTING
FINISHING TIPS
SERVICING OF DOUBLE-INSULATED APPLIANCES
EXPLODED PARTS VIEW
SAFETY INSTRUCTIONS
WARNING! FIRE AND EXPLOSION HAZARD.
IMPORTANT ELECTRICAL INFORMATION
DOUBLE INSULATED APPLIANCE
I
MPORTANT: SELECTING PAINT
SURFACE AND JOB PREPARATION
VISCOSITY & THINNING
THINNING
F
ILLING THE PAINT CONTAINER
O
PERATION
STARTING TO SPRAY
TECHNIQUE
TROUBLESHOOTING
T
OP TIPS
CLEANING INSTRUCTIONS
PARTS LIST
SPRAY GUN
FLUID TIP AND NEEDLE
TURBINE UNIT
AFTER USE
FLUID TIPS AND NEEDLES
NEEDLE SELECTION GUIDELINES
CHANGING THE TIP AND NEEDLE
TROUBLESHOOTING
FINISHING TIPS
SERVICING OF DOUBLE-INSULATED APPLIANCES
EXPLODED PARTS VIEW
S
AFETY INSTRUCTIONS
WARNING! FIRE AND EXPLOSION HAZARD.
IMPORTANT ELECTRICAL INFORMATION
DOUBLE INSULATED APPLIANCE
IMPORTANT: SELECTING PAINT
SURFACE AND JOB PREPARATION
VISCOSITY & THINNING
THINNING
FILLING THE PAINT CONTAINER
OPERATION
STARTING TO SPRAY
TECHNIQUE
TROUBLESHOOTING
TOP TIPS
CLEANING INSTRUCTIONS
PARTS LIST
SPRAY GUN
FLUID TIP AND NEEDLE
TURBINE UNIT
AFTER USE
FLUID TIPS AND NEEDLES
NEEDLE SELECTION GUIDELINES
CHANGING THE TIP AND NEEDLE
TROUBLESHOOTING
FINISHING TIPS
SERVICING OF DOUBLE-INSULATED APPLIANCES