


SPRAY GUN
1. Remove the applicator container.
2. Pour any leftover paint into its container so that it
can be used for future projects.
3. Pour a quantity of the respective thinner into
container, shake the spray applicator lightly,
reassemble the applicator, then spray this liquid
through the applicator. Repeat this until the
thinner being sprayed is coming through with
no traces of paint.
4. Clean any traces of paint off the outside of the
spray applicator.
5. Clean the container Seal inside the spray
applicator body.
Remember to disconnect the unit from the mains power when undertaking any cleaning of the SprayPort.
THE SPRAY APPLICATOR MUST BE THOROUGHLY CLEANED IMMEDIATELY AFTER USE. IF THE PAINT
DRIES INSIDE THE GUN, CLEANING WILL BECOME MUCH MORE DIFFICULT AND MAY RENDER THE
APPLICATOR INOPERABLE. THIS IS NOT COVERED BY WARRANTY.
The spray applicator is the same as a paintbrush, if it is not cleaned it will go hard and can become useless. You
must therefore clean this out after use.
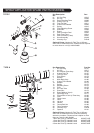
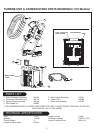
FLUID TIP & NEEDLE (Type P)
1. Unscrew Air Cap Ring (1)
2. Remove the Air Cap (2)
3. Completely remove Fluid Adjusting Screw (8)
4. Remove the Spring (7)
5. Remove the Fluid Tip Needle (6) by gently pulling
the trigger
6. Remove Direction Plate noting the position of
notches (3)
7. Remove the Fluid Tip (4)
7a. Remove Paint Feed Tube (12)
8. Remove Paint Container Seal (11)
9. Place all of these items into a container and clean
them using a brush and clean thinners
10. Clean the inside of the body of the gun
11. Thoroughly dry these parts before reassembling
12. Before refitting the Needle, dip its end into some
petroleum jelly. This will automatically lubricate
the gland washer as it is inserted (10)
13. Reassemble parts in reverse order
It is recommended to fit the Fluid Tip (4) prior to the needle to reduce the risk of damaging the needle tip.
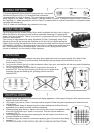
FLUID TIP & NEEDLE (Type A)
1. Remove the Air Cap Ring (1)
2. Remove the Air Cap (2)
3. Remove Direction Plate & Spring Assembly (3)
4. Unscrew Adjusting Screw (12) & pull out the
Needle (9) & Needle Spring (11).
5. Use the spanner supplied to remove the Fluid Tip
(4) & Fluid Tip Seal (5)
6. Immerse all of the parts above in thinners & clean
them thoroughly using the cleaning kit supplied
with the gun.
7. Before refitting the Needle, dip its end into some
petroleum jelly . This will automatically lubricate
the gland washer as it is inserted (16).
8. The external surfaces of the spray applicator can
be wiped clean with a cloth soaked in thinners.
NEVER DISPOSE OF PAINTS OR SOLVENTS INTO DRAINS. CONTACT YOUR LOCAL COUNCIL TO
ARRANGE COLLECTION OR FOR DETAILS OF NEAREST REGISTERED DISPOSAL SITE.
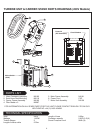
TURBINE UNIT AND CARRIER STAND
● The Turbine unit and the Carrier and Stand can be cleaned using a damp cloth and a little thinners to
remove paint stains.
CLEANING INSTRUCTIONS
9