


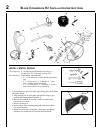

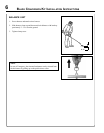
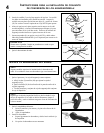
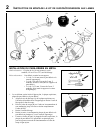
i n s t a l l h a r n e s s c l a m p
NOTE
Some models require installation of harness clamp. If your unit does
not have a clamp follow these directions.
1. Remove shield and gear housing as an assembly.
a. Loosen two (2) screws (M) that clamp the gear housing to the
shaft.
b. Remove locating screw (N) at the top of the gear housing.
c. Pull shield and gear housing assembly from the
drive shaft assembly.
NOTE
Prevent the exible drive cable from sliding from the drive shaft
housing. If cable does slide free, clean dirt from cable and re-lubri-
cate with lithium based grease prior to re-assembly.
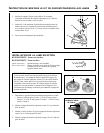
2. Remove front handle.
a. Remove screws and nuts and back plate from
handle.
b. Remove handle.
3. Install clamp.
a. Slightly spread clamp and slide up drive shaft.
b. Do not tighten clamp at this time.
M
M
N
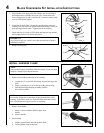
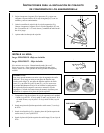
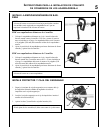
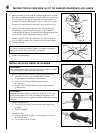
bl a d e co n v e r s i o n kit in s t a l l a t i o n in s t r u c t i o n s
5. Install Blade (I) on upper plate pilot. Blades must be installed so
that rotation arrow on blade faces gear case. Secure blade with
Lower xing plate (J), and 10 mm nut (K). Turn nut counter-clock-
wise on PTO shaft to tighten.
6. Align hole in upper plate with notch in gear housing, and insert
Locking Tool (A) to prevent splined shaft from turning. Arrow on
gear housing points to notch. Tighten 10 mm nut securely.
7. Insert split pin (L) in hole in PTO shaft, and bend pin legs around
shaft counterclockwise to retain 10 mm nut.
IMPORTANT
Never reuse a split pin - install a new split pin each time a blade is
installed or replaced.
8. Remove locking tool.
20
A
I
K
L
J
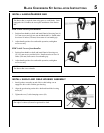
X or Y
I
J
K
L
A
4
X or Y