


MODEL 499A CL-01 MAINTENANCE
MAINTENANCE
CLEANING THE MEMBRANE.
Keep the membrane clean and free from dirt and algae.
Clean the membrane with water sprayed from a wash
bottle. Do not use tissues to clean the membrane.
REPLACING THE ELECTROLYTE SOLUTION AND
MEMBRANE.
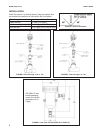
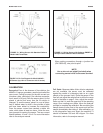
1. Unscrew the membrane retainer and remove the
membrane assembly and O-ring. See Figure 16.
2. Hold the sensor over a container with the cathode
pointing down.
3. Remove the fill plug and allow the electrolyte
solution to drain out.
4. Inspect the cathode. If it is tarnished, clean it using
a cotton-tipped swab dipped in baking soda or
alumina. Use type A dry powder alumina intended
for metallographic polishing of medium and soft
metals. Rinse thoroughly with water.
5. Wrap the plug with one or two turns of pipe tape.
Remove old tape first.
6. Prepare a new membrane. Hold the membrane
assembly with the cup formed by the membrane and
membrane holder pointing up. Fill the cup with elec-
trolyte solution and allow the wooden ring to soak up
the solution (usually takes several minutes).
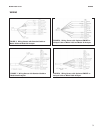
7. Hold the sensor at about a 45-degree angle with
the cathode end pointing up. Add electrolyte
solution through the fill hole until the liquid over-
flows. Tap the sensor near the threads to release
trapped air bubbles. Add more electrolyte solution
if necessary.
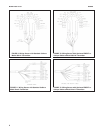
8. Place the fill plug in the electrolyte port and begin
screwing it in. After several threads have engaged,
rotate the sensor so that the cathode is pointing
up and continue tightening the fill plug. Do not
overtighten.
9. Place a new O-ring in the groove around the
cathode post. Cover the holes at the base of the
cathode stem with several drops of electrolyte
solution.
10. Insert a small blunt probe, like a toothpick with the
end cut off, through the pressure equalizing port.
See Figure 16.
NOTE
Do not use a sharp probe. It will puncture
the bladder and destroy the sensor.
Gently press the probe against the bladder several
times to force liquid through the holes at the base
of the cathode stem. Keep pressing the bladder
until no air bubbles can be seen leaving the holes.
Be sure the holes remain covered with electrolyte
solution.
11. Place a drop of electrolyte solution on the cathode,
then place the membrane assembly over the
cathode. Screw the membrane retainer in place.
12. The sensor may require several hours operating
at the polarizing voltage to equilibrate after the
electrolyte solution has been replenished.
6
Periodic maintenance and cleaning are required for best performance of the sensor. Generally, the membrane
and fill solution should be replaced every one to three months. If the sensor is being used in water having
conductivity less than about 100 µS/cm, it might be necessary to replace the fill solution (but not the membrane)
more often. Sensors installed in harsh or dirty environments require more frequent maintenance. The optimum
maintenance frequency is best determined by experience.
Fill solution may cause irritation. May be harmful if
swallowed. Read and follow manual.
PRESSURIZED SPRAY INJURY
Before removing the sensor, be absolutely certain
that the process pressure is reduced to 0 psig and
the process temperature is lowered to a safe level!
CAUTION
CAUTION