


12
English
2. When location is reached slowly lower compressor to ground.
Always store compressor in a vertical position resting on
the rubber bumpers and wheels.
PREPARATION FOR USE
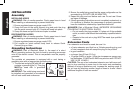
Pre-Start Checklist (Fig. 1)
1.
Ensure the On/Auto/Off switch (A) is in the OFF position.
2.
Plug the power cord into the correct branch circuit receptacle.
See Voltage and Circuit Protection under Installation.
3. Ensure air tank is drained, see Draining Air Tank under
Maintenance.
4. Ensure the drain valve (H) is closed.
5. Ensure safety valve (G) is functioning properly, see Checking
Safety Valve under Maintenance.
6. Pull the regulator knob (D) out and turn counterclockwise until fully
closed. Ensure regulated pressure gauge reads 0 PSI. Push knob
in to lock in place.
7. Attach hose and accessories. NOTE: Always use a minimum
3/8" (9.5 mm) or greater air hose rated at 300 PSI.
WARNING: Risk of unsafe operation. Firmly grasp air hose in hand
when installing or disconnecting to prevent hose whip.
WARNING:
Risk of unsafe operation. Do not use damaged or
worn accessories.
WARNING: Risk of Bursting. Too much air pressure causes a
hazardous risk of bursting. Check the manufacturer’s maximum
pressure rating for air tools and accessories. The regulator outlet
pressure must never exceed the maximum pressure rating.
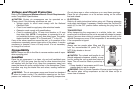
Initial Set-up
(Fig. 1)
WARNING: Do not operate this unit until you read and understand
this instruction manual for safety, operation and maintenance
instructions.
BREAK-IN PROCEDURE
WARNING: Risk of property damage. Serious damage may result if
the following break-in instructions are not closely followed.
This procedure is required before the air compressor is put into
service for the first time and when the check valve or a compressor
pump/motor has been replaced.
1. Ensure the On/Auto/Off switch (A) is in the OFF position.
NOTE: If hose is not connected to Quick Connect body, pull coupler
back until it clicks to prevent air from escaping through the quick
connect.
2.
Plug the power cord into the correct branch circuit receptacle.
See
Voltage and Circuit Protection under Installation.
3. Open the drain valve (turn lever counter-clockwise) fully to permit
air to escape and prevent air pressure build up in the air tank
during the break-in period.
4. Move the On/Auto/Off switch to the ON position. The compressor
will start.
5. Run the compressor for 15 minutes.
6. After 15 minutes, close the drain valve by turning lever
clockwise. The tank will fill to cut-out pressure and the motor
will stop.
7. Compressed air will be available until it is used or bled off.
OPERATING PROCEDURES
Start-up (Fig. 1)
1. Follow Pre-Start Checklist under Preparation for Use.
2. Move the On/Auto/Off switch to the ON position and allow tank
pressure to build. Motor will stop when tank pressure reaches
cut-out pressure.