


11
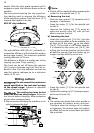
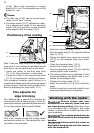
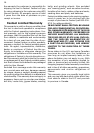
Changing the clamping collet
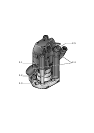
8.1
8.2
8.3
8.4
A
If necessary, slide the chip guard [8.2]
upwards until it engages.
Press the rocker [8.1] for the spindle lock
to side A.
Unscrew the locking nut [8.3] completely.
Remove the locking nut from the spindle
together with the clamping collet [8.4]. Do
not separate the locking nut and clamping
collet as these form a single component.
Attach a new clamping collet with locking
nut to the spindle.
Screw on the locking nut loosely. Do not
tighten the locking nut until a router bit is
inserted.Adjusting the milling depth
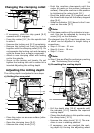
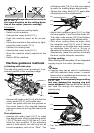
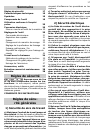
Adjusting the milling depth
The milling depth is adjusted in two steps:
a) Setting the zero point
6
7
8
9
80
70
60
50
40
30
20
10
0
9.1
9.2
9.3
9.4
9.5
9.7
9.6
A
B
C
Place the router on an even surface (refer-
ence surface).
Open the clamping lever [9.2].
Unscrew the rotary knob [9.1].
–
–
–
–
–
–
–
–
–
Push the machine downwards until the
router bit rests on the surface (reference
surface). Clamp the machine in this position
by tightening the rotary knob [9.1].
Press the depth stop [9.3] against one of
the three fi xed stops on the rotary stepped
stop [9.4].
Slide the indicator [9.5] down to the 0 mm
mark on the scale [9.7].
Note:
If the base position of the indicator is incor-
rect, this can be adjusted by turning the
screw [9.6] on the indicator.
The stepped stop [9.4] has three stops, two
of which can be adjusted in height using a
screwdriver:
Stop A: 18 mm - 51 mm
Stop B: 6 mm - 18 mm
Stop C: 0 mm
Note:
Stop C has an offset for preliminary routing
- see "Preliminary/Fine routing".
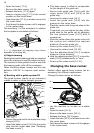
b) Presetting the routing depth
6
7
8
9
80
70
60
50
40
30
20
10
0
10.1
10.5
10.6
10.8
10.3
10.2
10.4
10.7
Pull the depth stop [10.4] upwards until
the indicator [10.2] reaches the required
routing depth.
Clamp the depth stop in this position using
the clamp lever [10.3].
Unscrew the rotary knob [10.1]. The ma-
chine is now in starting position.
If necessary, you can readjust the rout-
ing depth by turning the adjusting wheel
–
–
–
f
•
•
•
f
–
–
–
–