


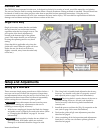
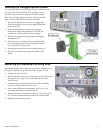

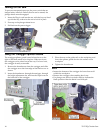

Adjusting the Guide Rail Gib Cams
The guide rail gib cams tighten against the rib of the guide
rail to remove any side-play from the saw during a cut.
Thumbwheels on the top of the cams permit easy
adjustment.
1. Place the saw on the guide rail.
2. Loosen both cams by rotating the
thumbwheels counterclockwise.
3. Working with one cam at a time, jiggle
the saw side-to-side while turning the
cam clockwise until the saw fits
snugly to the rail.
4. Repeat for the second cam.
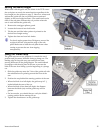
5. Make sure the cams are not over
tightened by sliding the saw down the
guide rail. If the saw does not slide
easily, loosen the cams.
Notes:
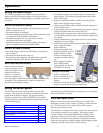
► The cams do not need to be very tight for normal
operations. A tiny amount of side-play will not impact the
quality of a cut.
► The cam action of the gibs allows for a large force to be
applied to the gibs from a small amount of turning of the
thumbwheel.
► Over tightening the cams or operating the saw in abrasive
environments can cause premature wear. Periodically
inspect the cams for flat spots, and replace if necessary.
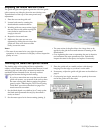
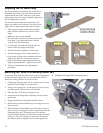
Trimming the Guide Rail Splinter Guard
The leading edge of the guide rail has a replaceable,
rubber, zero-clearance strip. The first time the saw is used
with the guide rail, this strip is trimmed to match the
sawblade. When trimmed to size, this strip reduces
chipping and tearout during normal cutting.
If you have more than one saw that uses the same
guide rail system, you want all of the tools to have
the same cutting path. Before cutting the splinter
guard, use the "Matching the TS 55 to an Existin
Guide Rail" procedure desc
8 TS 55 EQ Circular Saw
g
ribed on page 12 to
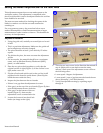
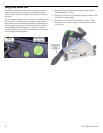
1. at
etrate the strip by about half a
2. Set the motor speed to its lowest setting (setting 1).
match one tool to another.
Set the blade depth very shallow (6 to 7 mm) so th
the blade teeth pen
tooth, as shown.
3. Place the guide rail on a stable surface with the strip
hanging over the edge so you don’t cut the table.
4. If necessary, adjust the guide rail gib cams as described on
page 8.
5. Cut the strip in a single, smooth, low-speed rip from one
end of the guide rail to the other.