


11
Press the contact slide down until it latches f
into position.
Insert the handle section [1-6] at the same f
way.
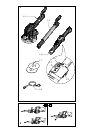
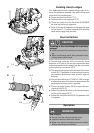
If you wish to use the L
PLANEX
for sanding
walls in cramped spaces, for example, reduce
the length of the machine by fi tting the sanding
head [1-1] directly to the handle section [1-6].
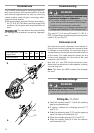
When disassembling the machine, do not forget f
to press the button [4-1] to release the contact
slide before opening clamping levers [3-1] and
[3-2].
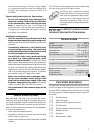
Electronics
The machine features full-wave electronics with
the following properties:
Smooth start-up
The electronically controlled smooth start-up
function ensures that the machine starts up
smoothly.
Speed control
You can regulate the rotational speed steplessly
between 310 and 920 rpm using the adjusting
wheel [1-3]. This enables you to optimise the cut-
ting speed to suit the respective material.
Constant speed
The preselected motor speed remains constant
through electronic control. This ensures a uniform
cutting speed even when under strain.
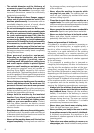
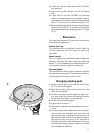
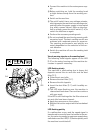
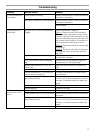
Changing sanding pads
Insert an Allen key (size 5) into the Allen screw f
[5-1] on the sanding pad.
Hold the sanding pad securely and turn the f
Allen key to release.
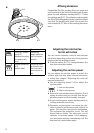
In order to further ensure optimum axial run- L
out, you must fi rst clean the bearing surface
for the grinding disk on the driveshaft.
Attach the new sanding pad. f
Tighten the screw f [5-1].
Only attach specifi ed sanding pads to the ma- L
chine.
In order to guarantee optimum suction output, L
the sealing face between the machine and
the grinding disk is ground in during the fi rst
few minutes after the disk has been changed.
During this time, the r.p.m. of the machine is
slightly lower and white foam particles form
during the grinding process. However, they do
not damage the machine.
5
5-1 5-2