


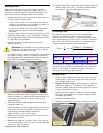


26 Kapex KS120 Miter Saw
Calibrating the Bevel Angle
Calibrating the bevel angle uses the same 4-cut method
described in the Calibrating the Miter Angle
procedure on
page 24. Refer to the discussion on page 24 for an
explanation of the method.
Except for cutting tall miters, the bevel setting accuracy is
generally less critical than the miter setting accuracy. Take
care not to attempt to over-calibrate this setting.
Getting Started
You will need a piece of scrap wood that is between 4 and
4-3/4 inches on a side. The scrap does not need to be
perfectly square, but at least the first edge must be
straight. The larger the piece, the more accurate your final
measurement will be, but 4-3/4” is the maximum size that
can be cut using the Tall Miter Setting (see page 14).
The material can be anything, but Medium Density
Fiberboard (MDF) will give you the cleanest cuts, and
therefore, the easiest to measure.
► High density plywood, such as Baltic birch, will also give
very accurate results.
► Low-grade plywood may have rough edges, depending
on the quality, and therefore, may provide the lowest
accuracy.
► Solid wood can also be used, but you may experience
burning on the rip-cuts if you are using a fine-tooth
blade.
You will need a ruler to measure the length of the final
offcut, and optionally, a dial caliper to accurately measure
the difference in the width of the offcut at both ends. This
width measurement is the most critical, so a dial caliper is
recommended.
It does not matter whether your measurements
are in metric units or imperial units.
Measuring the Error
Before adjusting the saw, you first need to measure
whether it is accurately calibrated to begin with. The
factory calibration threshold is ±0.5°. If you attempt to
exceed this calibration threshold, you may end up actually
making the saw less accurate.
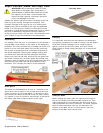
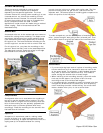
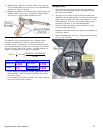
1. Number the sides of the scrap piece of wood from 1 to
4, starting with the best edge.
► If you cut the wood on the left side of the blade (as
shown in this example), then number the sides in a
counterclockwise direction (as shown).
► If you cut the wood on the right side of the blade,
then number the sides in a clockwise direction.
► Note that this is the opposite from the miter
calibration numbering.
2. On the #1 side, which will eventually become the final
calibration offcut, label it “Left” and “Right” as shown.
Do this regardless whether the cut is made on the left
or right side of the sawblade.
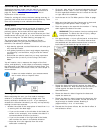
3. Lock the saw in the Tall Miter position. Refer to page
14.
4. Make sure that both auxiliary fences are in place and
supporting the workpiece. Refer to page 13.
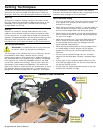
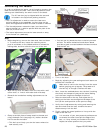
5. Place the scrap on the saw with the number “1” facing
down against the base of the saw.
WARNING! This procedure involves cutting small
workpieces. To reduce the risk of injury, always
clamp the workpiece to the saw.
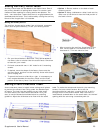
6. Cut approximately 1/4-inch off the board, so that there
is at least a 1/8-inch offcut. This offcut ensures that
the sawblade will be stable because there is wood on
both sides of the blade during the entire cut.
7. Rotate the board with side #2 against the base and
repeat the same cut. Note that the side previously cut
is now against the base for each of the four cuts
described below.
8. Rotate the board to side #3 against the base and
repeat the same cut.
9. Rotate the board to side #4 against the base, but this
time, make the cut a little wider, so that the offcut is
large enough to handle without breaking it
(approximately 1/4 to 1/2 inch wide).
10. Discard the first three offcuts, but the fourth offcut is
the calibration offcut.