


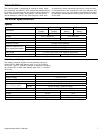


Supplemental Owner’s Manual 9
Changing Base Inserts
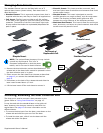
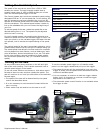
The standard Carvex base can be tted with one of 5
optional base inserts (shown below). Each base insert is
described below.
► Standard Insert: This is a general purpose insert that is
supplied with the saw, and may be used in all applications.
► Felt Insert: The felt insert provides a soft felt surface
to the base of the jigsaw for mar-free cutting on nished
materials. The bottom of the felt insert has a tight hook-
&-loop surface that holds the replaceable/disposable felt
pads in place.
► Phenolic Insert: This insert provides a smooth, hard,
and low-friction base for abrasive environments that could
scratch softer inserts.
► Dimpled Insert: This insert is designed to provide
smooth operation on rough surfaces, such as rough-sawn
lumber. The dimples (rounded studs) glide over and
between the rough features of the workpiece surface.
► Stainless Steel Insert: This insert is ideal for working on
steel, aluminum, and other very hard materials that would
scratch even the phenolic insert.
Felt Insert w/
Replaceable Felt
Stainless Steel Insert
Phenolic Insert
Standard Insert
Dimpled Insert
NOTE: The optional Base Accessory Kit may include
a small key and lanyard. This is for a
European conguration to lock the power
button, and is not used in North America.
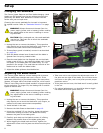
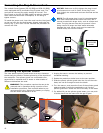
1. Remove the dust collection port as described below. The
release tab on the base insert cannot be pressed in when
the dust collection port is in place.
2. Either remove the main base from the saw as described
on page 10, or remove the sawblade described on
page 8.
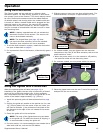
3. Press down on the back of the release tab and slide the
base insert forward about 1/2 inch.
4. Lift the base insert off the main base to remove it.
Release
Tab
Base
Insert
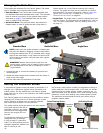
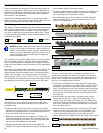
Installing/Removing the Dust Collection Port
The dust port is used to connect a dust extractor to the
jigsaw. Refer to “Using Dust Extraction” on page 15.
It may be used with the standard base or the guide rail
base. However, the dust port cannot be used with the
angled base. See page 10 for more information on the
different bases.
► To remove the dust port from the base, press down on the
release tab and slide the port out from the base.
► To install the dust port, slide it into the base until the
release tab clicks into place.
Release
Tab
Dust
Port