


6
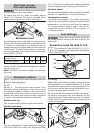
Attaching the abrasive
Stickfi x is a hook-and-loop fastening sys-
tem. Stickfi x sanding pads allow the use
of self-adhesive hook-and-loop abrasives
such as Stickfi x sandpapers and sanding
cloths.
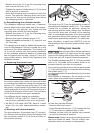
Simply press the abrasive onto the sanding pad
and pull it off again after use.
Use only abrasives with an undam-
aged Stickfi x hook-and-loop coating. Before use,
check that the coating has not been damaged by
improper use (such as over heating).
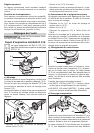
The Mini-Stickfi x D 52 sanding pad
was developed for use in confi ned spaces and
with small areas. This small-diameter pad and
the affi xed abrasive will inevitably heat up in use
more than larger pads, since the same pressure
is distributed over a smaller area. Sand only with
moderate pressure and do not sand continuously
for too long. Lift the sander off the workpiece at
intervals to allow friction heat to dissi-pate.
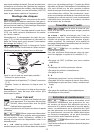
Working with the tool
Always secure the workpiece in
such a manner that it cannot move while being
sanded.
Never overload the tool by using
too much pressure! The best sanding results
are achieved when applying moderate pressure.
Sanding performance and quality depend primarily
on the choice of the right abrasive.
For safe guidance, always hold the
tool with both hands.
We recommend the following settings on the ro-
tary control (2.1) for electronic machines:
6
• Sanding hard GRP components (limited suit-
ability).
3 - 6
• Sanding off dry, cracked paint.
• Stripping anti-fouling paints.
• Sanding wood.
2 - 4
• Sanding paint/varnish with tendency to smear
• Light sanding of thin top coats of paint.
• Cleaning sandstone, concrete, formwork materi-
als.
1 - 2
• Sanding thermoplastic materials.
• Smoothing treated woods with sanding brush.
Maintenance and care
All maintenance or repair work re-
quiring the motor housing to be opened must be
carried out only by an authorized service work-
shop. Maintenance or repair work carried out by
an unauthorized person can lead to the incorrect
connection of the wiring or other components,
which in turn can lead to accidents with serious
consequences.
Always remove the plug from the
mains supply socket before carrying out any work
on the machine!
Always keep the tool and in particular the ventila-
tion slots clean.
The tool is fi tted with special motor brushes with
an automatic cut-out. When the brushes become
worn the power supply is shut off automatically
and the tool comes to a standstill.
Accessories, tools
For safety reasons, only use original
Festool accessories and tools!
The accessory and tool order number can be found
in the Festool catalog or on the Internet under
www.festool-usa.com.
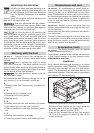
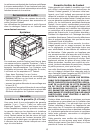
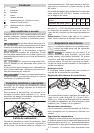
Systainer
Many Festool products are shipped in a unique
system container, called "Systainer". This provides
protection and storage for the tool and acces-
sories. The Systainers are stackable and can be
interlocked together. They also can be interlocked
atop Festool CT dust extractors.
8.1
8.2
8.3
– Place one systainer on top of the other.
– Release all four latches on the lower systainer
by pulling back at their top edges (8.1).
– Slide all four latches upward (8.2).
– Snap all four latches back to their fl at position
(8.3) so they engage the stacking tabs of the
upper systainer.