


11
English
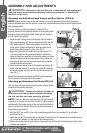
4.Slidethetoolresttowithinamaximumof1/16"(1.5mm)fromthewheel.Rotatethewheelonefull
revolutionbyhandtoensurethewheeldoesnotcontactthetoolrest.
5.Tightenthelockingknobrmlytoretaintheassembly.
6.RepeattheassemblyoperationfortheRIGHTtoolrest.
Mounting Bench Grinder
Ifduringoperationofthebenchgrinderthereisanytendencyforthegrindertoslideor"walk"orto
tipover,thenthegrindermustbesecuredtoaworkbenchorothersupportingsurfaceusingfasteners
(notsupplied)throughthetwoholesinthegrinderbase.
Beforemountingthegrindertoaworkbenchorsimilarsurface,determinetheidealmountingposition
byperformingaseriesofnon-poweredtestswithitemsthatwilltypicallybeusedonthegrinder(e.g.
lawnmowerblades,scissors,knives,woodchisels,woodturningtools,etc.)Thesetestsrunswillhelp
determinehowneartheworkbenchedgethegrindershouldbemountedsothatthebenchtopdoes
interferewithgrindingoperations.Besuretheworkbenchorpedestaltowhichthebenchgrinder
willbemountedisat,level,andsturdyenoughtobeartheweightofthegrinder,othertools,andthe
materialbeingworked.
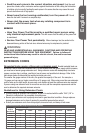
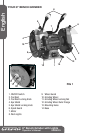
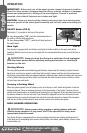
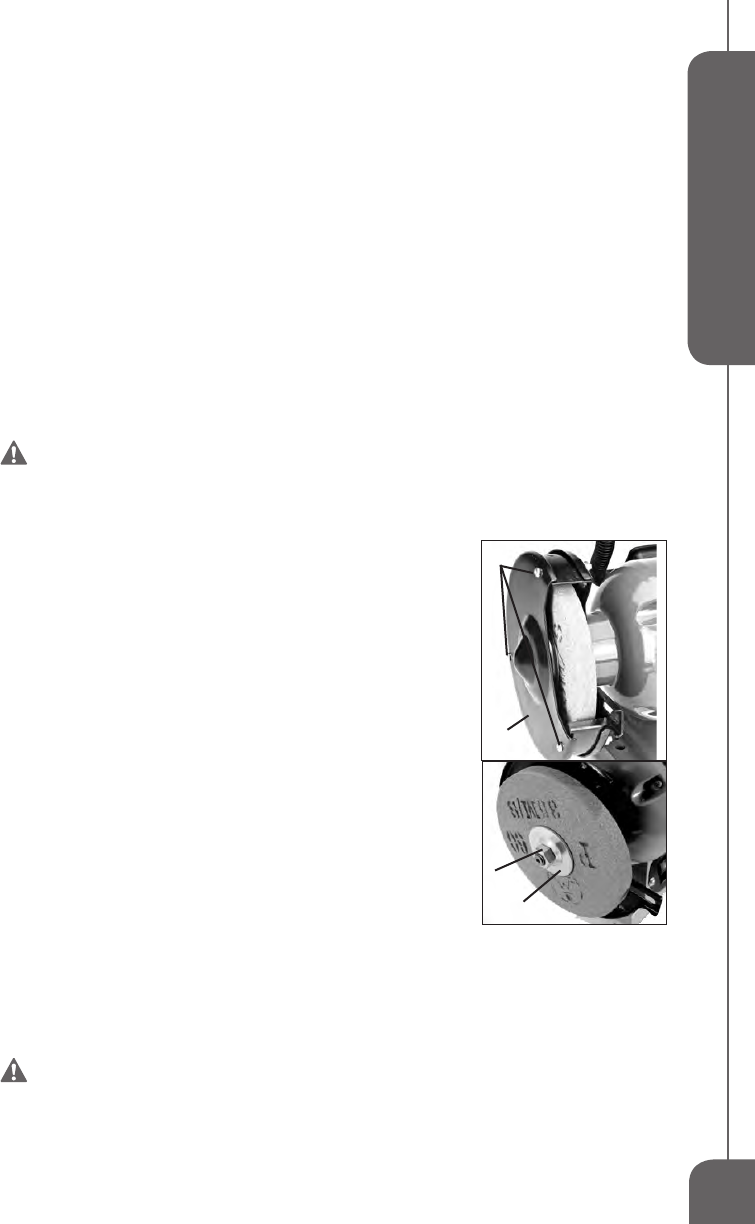
Changing the Grinding Wheels (FIG 7)
WARNING: Useonlygrindingwheelsratedfor3,600rpmorhigherwith
a1/2"arborholeorappropriatesizedbushing.Neveruseagrindingwheel
ratedlowerthan3,600rpmorattempttomachineanundersizedwheeltot
the arbor.
1.Removethethreebolts(1)attachingtheprotectivesidecover(2)to
thegrinder;thenremovethesidecover.
2.Preventtheshaftfromrotatingbyplacingawedgebetweenthe
wheelandthetoolrest.
3.Facingthefrontofthebenchgrinder:toreplacethewheelon
theleftside,turnthearbornut(3)clockwisetoloosenand
counterclockwisetotightenthearbornut.
4.Toreplacethewheelontheright:turncounterclockwisetoloosen
andclockwisetotighten.
NOTE:Manygrindingwheelsuseremovableandadjustablearbor
bushingstoallowadaptationtovariousmachinearbordiameters.
Savethisbushingforfutureuseifnotneededtoinstallthe
replacementwheel.
5.Removethearbornut(3),outerange(4)andtheoldwheel.
6.Installthereplacementwheelandouterangeontheshaft.Make
surethewheelisslidet(notloose)ontheshaft.
7.Replacethearbornutandtighten.
8.Replacethesidecover.Reinsertthethreeboltsandtightentheside
coverinplace.
9.Re-adjusttoolrest,sparkguardandeyeshield.
10.Rotatethewheelbyhandtocheckfreemovementandproper
adjustments.
WARNING: Do not overtighten wheel nuts when installing grinding
wheels. Tighten the wheel nut enough to drive the wheel and prevent slippage.
1
FIG 7
2
4
3