


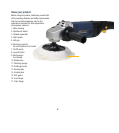


11
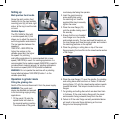
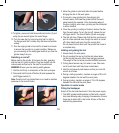
2. Align the sandpaper with the
rubber disc and press down
firmly to ensure a good grip.
3. Special care must be taken
with Hook & Loop platens,
as a build up of dust, or
wearing the sandpaper down
completely before changing
it, can result in damage to the
hooks & loops on the platen
and require a new platen to be fitted.
Note. Hook & Loop platens are not a warranty item.
Selecting the right grade of sandpaper
1. Different grades of sandpaper can be purchased from
your local hardware store.
2. Typical grades are coarse (40–60 grit), medium (80–100
grit), and fine (120–240 grit).
3. Use coarse grade to remove rough finishes, medium
grade to smooth the work, and fine grade to finish it off.
4. It is best to make a trial run on a scrap piece of material
to determine the optimum grades of sandpaper for a
particular job.
Switching on and off
IMPORTANT. When the product is being used for sanding
only use speed settings between 1 and 3. Never use speed
setting greater than position 3.
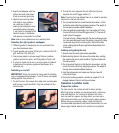
1. To start the tool, first ensure the rubber disc, sanding disc
and tool are in good condition. Plug the cordset into the
mains socket.
2. To start the tool, depress the lock-off button (8) and
squeeze the on/off trigger switch (7).
Note. Once the tool has started there is no need to maintain
pressure on the lock-off button.
3. Do not overload the tool so that the disc slows down. Let the
tool do the work rather than applying pressure. The weight of
the tool alone provides sufficient pressure.
4. After completing the application, turn the sander off. To turn
the tool off let go of the on/off trigger switch (7). The lock-off
button (8) will re-engage.
The tool will stop. (Please note that the disc continues to spin
for a few seconds even though the switch is turned off). Keep
hands well away from the moving disc. Wait until the disc
stops rotating before lifting the grinder/sander/polisher from
the surface.
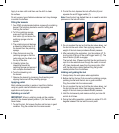
Holding and guiding the tool
1. Always clamp the work piece where applicable.
2. Before starting the tool, first ensure the rubber disc, sanding
disc and the tool are in good condition. Plug the cordset into
the mains socket.
3. Do not overload the tool so that the disc slows down. Let the
tool do the work rather than applying pressure. The weight of
the tool alone provides sufficient pressure.
4. Hold the tool securely and make sure that you have full
control at all times.
5. During the sanding operation, maintain an angle of 10–15
degrees between the tool and the work piece.
Operation in polisher mode
Prepare the surface
For best results, the surface should be clean and dry.
Most high-gloss surfaces can be cleaned with a mild soap
and water solution. For removal of stubborn dirt stains
such as road tar, grease, and bug stains, you can use a
mild ammonia solution such as that used in glass cleaners.
Before using any cleaning product, check the label for
recommended applications and follow the directions for use.
Never apply cleaner directly onto surface to be polished.