


12
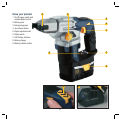
Loading a nail
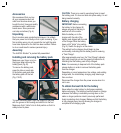
1. Hold the nailer in the operating
position and use your thumb
to press the jaw release button
(4) (Fig. K).
2. Insert the nail, head first,
between the jaws (3) as far as
it will go and then release the
jaws by taking your thumb off
the jaw release button (4) (Fig. L).
Note. The nailer accepts nails
from 40mm (1 5/8”) to
150mm
(6”) long.
The shank can be oval,
round or serrated. The head
must not be more than 10mm
(3/8”) in diameter.
You are now ready to use
the nailer
.
Driving a nail
1. Once the nail is inserted in
the jaws and button (4) is
released, the nail can be
driven into the workpiece.
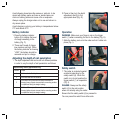
2. Hold the tool such that the nail
is guided into the workpiece
by the automatic hammering
process (Fig. M).
3. Squeeze the trigger switch (1)
(Fig. N).
4. When the nail has been driven
to the required depth, release
trigger switch (1) and either
return the safety switch (6)
to its mid position or use the
release button (4) to open the
jaws and insert another nail.
Note. It is best to trial the depth adjustment setting using
the same type of nail on a scrap piece of wood of the same
type as the workpiece. It may be necessary to change the
depth setting to suit the circumstances.
Note. The nail can be driven between the perpendicular
and 45°.
WARNING. To avoid personal injury, keep your fingers away
from the trigger switch (1) until you are ready to drive a nail.
Do not point the nailer at anyone when a nail is loaded into
the nailer.
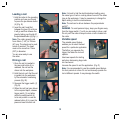
Variable speed
The variable speed feature
enables you to select the best
speed for a particular application.
The farther you squeeze the
trigger, the faster the tool will
operate.
Use lower speeds for starting
and when hammering large nails
into hard wood.
Increase the speed to suit the application. (Fig. O)
Note. It is recommended to use the variable speed feature
for short periods at a time. Do not continuously operate the
tool at different speeds. It may damage the switch.
M
N
O
L
K