


Operation
Important. Prior to using the grinder, check that the eye
shields, spark deflectors, and tool rests are fitted and
correctly adjusted and that you are wearing safety gear
including eye, hearing and breathing protection.
1. Turn the wheel by hand to make sure it does not touch
the guard, eye shields, spark deflectors or tool rests and
runs freely.
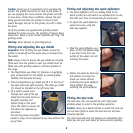
2. Stand to one side, turn the switch (8) on and allow the
motor to reach full speed.
3. Support the work piece on the tool rest (10) and
gradually feed the work piece onto the wheel. Use pliers
to hold small work pieces.
Note. Traverse the work piece across the full width of the
wheel to prolong its flat surface.
4. If the grinding operation causes the motor speed to
noticeably decrease, pull back the work piece, allow the
motor to regain full speed and restart the grinding
operation, but apply less force.
Warnings. Only use the front face of the grinding wheel,
not the sides. Note that the work piece can get very warm.
It may be necessary to cool a work piece by dipping it in a
coolant or in water. Do not apply coolant or water to the
grinding wheel.
Changing a grinding wheel
Important. Prior to changing a wheel, ensure the grinder
is turned off and the power plug is removed from the
socket. Make sure that the replacement wheel is rated at
3000RPM or higher.
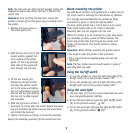
1. Remove the retaining screw and
take off the tool rest (10).
2. Remove the retaining screw
and take off the spark
deflector (12).
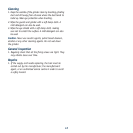
3. Take off the third retaining
screw and remove the outer
guard (4).
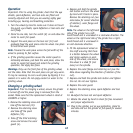
4. Depress and hold the spindle
lock button and turn the wheel
by hand until it locks in place.
Remove the retaining nut (see
note below for correct direction
of rotation), outer flange and
the wheel.
Note. The wheel on the left-hand
side of the grinder has a left-
hand thread and is unscrewed in a clockwise direction. The
wheel on the right-hand side of the grinder has a right-
hand thread and is unscrewed in
an anti-clockwise direction.
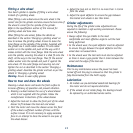
5. Fit the replacement wheel on
the shaft ensuring that there
is a blotter between the wheel
and clamp washers on each
side of the wheel, and ensure
the wheel is a slide fit (not
loose) on the spindle.
6. Replace the outer flange and retaining nut (see the
Note above regarding the direction of rotation of the
nut).
7. Depress and hold the spindle lock button and tighten
the nut. Do not over tighten.
8. Replace the outer guard.
9. Replace the retaining screw, spark deflector and tool
rest.
10. Re-adjust the tool rest and spark deflector.
11. Rotate the wheel by hand to check for free movement
and proper adjustments.
12. Plug in the grinder, put on eye protection, stand to
one side and run the grinder at full speed for several
minutes.
10