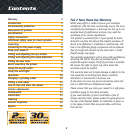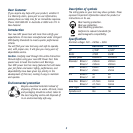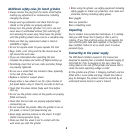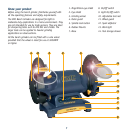
Note. The tool rests are right and left handed. Follow the
diagrams to ensure the correct tool rest is fitted to the
correct side.
Important. Prior to fitting the tool rests, ensure the
grinder is turned off and the power plug is removed from
the socket.
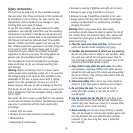
1. Remove the lower screw on
the wheel guard (11).
2. Hold the tool rest (10) in the
correct position against the
inner surface of the wheel
guard. Fit the screw through
both sides of the guard and
then through the tool rest.
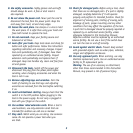
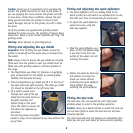
3. Fit the star washer first,
followed by the flat washer
and then the plastic coated
nut to the screw and tighten
the nut sufficiently to support
the tool rest but still allowing
the tool rest to slide inwards
and outwards.
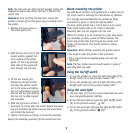
4. Slide the tool rest to within a
maximum of 1.5mm from the wheel. Rotate the wheel
one full revolution by hand to ensure the wheel does
not contact the tool rest.
5. Tighten the thumb nut firmly to retain the assembly.
Repeat the assembly operation for the second tool rest.
Bench mounting the grinder
The GMC Bench Grinders are supplied with 4 rubber mounts
(6) which assist in reducing the transmission of vibration.
It is strongly recommended that the grinder be firmly
mounted to a bench or stand for safe operation.
The base of the grinder has a 12mm hole in each corner.
These holes accept bolts up to 10mm in diameter.
Mounting bolts are not supplied with the unit.
Where the grinder is to be mounted to a steel work bench,
it is advisable to place a piece of timber between the
bench and grinder then bolt through the grinder and
timber into the bench. This further assists to reduce
vibration.
Important. When directly mounting the grinder ensure:
• The surface under the grinder is flat and clean.
• The 4 mount bolts are applied evenly and not over
tightened.
Note. The four rubber mounts should remain in place if
mounting bolts are used.
Using the On/Off switch
1. To turn the grinder on, press the right hand side of the
On/Off switch (8) to the position marked "ON"
2. To turn the grinder off, press the left hand side of the
On/Off switch (8) to the position marked "OFF".
Using the work light
1. The work light (13) can be used to illuminate the work
area and provide greater visibility.
2. To turn the work light on press the light On/Off switch
(9) to the position marked " ON".
3. To turn the work light off press the light On/Off switch
(9) to the position marked " OFF".
9


