


8
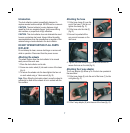
3. Ensure it is pushed all the way on and is secure on
the hose.
4. Tighten the hose clamp using a flat end screwdriver to
secure the 2 way adaptor onto the hose (fig. H).
5. When using only 1 tool fit
the cap onto the end of the other hole in the 2 way
adaptor (fig. I).
H
I
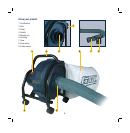
Attaching the dust bag
1. Fit the dust bag over the outlet (3) (fig. J).
2. Place the dust bag strap through the metal clamp.
3. Pull the strap to secure the dust bag on the outlet cover
(fig. K).
J
K
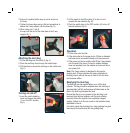
Turning on and off
1. Insert the switch disabling
insert and ensure the switch
(1) is in the OFF position
(fig. L).
2. Lift the switch to the ON position (I) to turn on and
operate the dust collector (fig. M).
3. Push the switch down to the OFF position (0) to turn off
the dust collector (fig. N).
M
N
Operation
1. Fit the hose onto the inlet.
2. If the dust outlet on the power tool is 100mm in diameter
the hose can be connected directly onto the power tool.
3. If the power tool has a smaller outlet fit the 2 way adaptor
onto the end of the hose. Connect a smaller diameter
hose (not supplied) onto the adaptor and connect this to
your power tool.
Note. The 2 way adaptor is designed for fine dust ie.
sanding dust. If larger particles are being collected and
blocking occurs remove the cap to draw air into the hose
and increase airflow.
Emptying the dust bag
The dust bag can be emptied either on or off the dust
collector. The bag should be emptied when the dust bag is
approximately half full, performance will deteriorate as the
dust in the dust bag exceeds this level.
Ensure that the zip is not opened or the dust bag is not
removed from the dust collector until the dust collector
is turned off and the impellor has completely stopped
rotating. Failure to do this can result in dust particles being
distributed in the air.
It is best to place the dust bag into a large garbage bag and
then empty the dust directly into the garbage bag.
L