


9
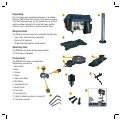
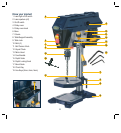
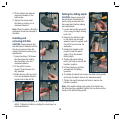
Assembly
1. Place base (6) on floor.
2. Place column assembly (7) on
base and align the 3 holes in
the column assembly with the
holes in the base.
3. Using the 3 bolts secure
the column support to the
base and tighten with a
13mm wrench.
4. Fit the table (8) over the
column and secure to the
column using the table
lock (9).
5. Fit the motor head (13) to the
top of the column and tighten
the 2 grub screws using the
4mm hex key. This will secure
the head on the column.
6. Fit the 3 handle rods to the handle hub on the drill
press head, attach them by rotating each handle in a
clockwise direction.
7. Fit the chuck (12) onto the
spindle and secure it by
pushing it and giving it a
sharp tap.
Note. Ensure both surfaces are
clean before putting the chuck on
the spindle.
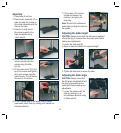
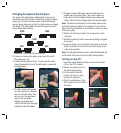
Adjusting the table height
CAUTION. Always ensure that the drill press is switched
off and the plug is removed from the power point before
making any adjustments.
1. Loosen the table lock (9).
2. Raise or lower the table to the required height
3. Tighten the table lock to secure the table.
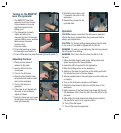
Adjusting the table angle
CAUTION. Always ensure that
the drill press is switched off and
the plug is removed from the
power point before making any
adjustments.
1. Loosen the screw under the
table by rotating it in an
anti-clockwise direction using
a 19mm wrench.