


11
Overload cutout
The saw should not be overloaded
through attempts to take too deep
a cut, too fast a cut or operated
for too long. The saw should not
be operated for more than 30
minutes continuously after which
time it should be allowed to cool
for a period of at least 5 minutes.
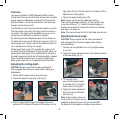
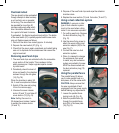
If overloaded, the thermal overload circuit will trip. The button
of the reset switch (27) is partially ejected and the saw motor
cuts out. Restore power as follows.
1. Wait until the motor has cooled (approx. 5 minutes).
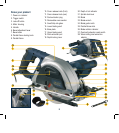
2. Depress the reset switch (27) (Fig. L).
3. Check that the saw is again operational and restart taking
care not to duplicate the circumstances that caused the
original overload.
Removing swarf and chips
1. The swarf and chips are collected within the removable
cover section of the handle. This provides a further
safety measure as it helps suppress sparks caused
by metal swarf.
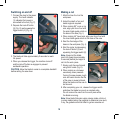
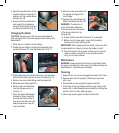
2. Periodically check the level of
chips and swarf in the chamber
as seen through the site glass
(14) (Fig. M).
When the chamber is about 3/4
full, it must be emptied as follows.
3. Switch off the saw and unplug
it from the mains supply.
4. Unscrew the cover release
knobs (10 and 11) and take off
cover section (13) (Fig. N).
Note. Setting the saw to a
30 degree bevel makes it easier
to access the release knobs
(10 and 11).
5. Dispose of the swarf and chips and wipe the collection
chamber clean.
6. Replace the cover section (13) and the knobs (10 and 11).
Using a dust collection system
WARNING. A vacuum or other
type of dust collection system
must not be used when cutting
metal. It can cause an explosion!
1. For cutting wood only. Remove
the dust extraction plug (12)
(Fig. O).
2. Use the same fixing screw to
attach the wood cutting dust
extraction adaptor (28) to the
saw (Fig. P).
3. Connect the saw to a dust
extraction system.
4. When it is desired to change
the workpieces from wood
to metal, any dust extraction
system connected to the saw
MUST be disconnected and
the dust extraction plug (12)
replaced.
Using the parallel fence
The parallel fence (9) allows
you to make parallel cuts in a
workpiece, all at the same width.
CAUTION. Always ensure that
the saw is switched off and
unplugged from the power supply
before making any adjustments.
1. Loosen the parallel fence
locking knob (8) (Fig. Q).
2. Slide the parallel fence (9)
through the parallel fence
slots (25) in the base plate
(16) (Fig. R).
Q
M
N
O
R
L
P