


9
Overview
You have purchased a 1300W Magnesium Multi Function
Circular Saw that can cut both ferrous and non ferrous metals
quickly, cleanly and efficiently, as well as PVC pipe and soft
and hard timbers - all with the same blade. It can even saw
through wood containing nails!
The finished cut is burr free and there are virtually no sparks.
The saw utilises cold cutting technology and thus requires
no coolant. The metal can be handled as soon as it is cut,
saving time and adding to the safety of operation.
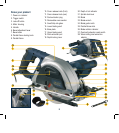
By loosening the bevel adjustment lever (6), the body and
the blade of the saw can be tilted to any angle up to 45° for
making angle cuts. Please note that the maximum depth of
cut is reduced when cutting at an angle.
A fixed upper blade guard (17) encloses the upper part of
the blade. As the saw advances through the work piece, the
pivoting lower blade guard (15) is pushed back by the edge of
the wood to expose only that part of the blade which is needed.
When the blade clears the work, the spring loaded lower
blade guard snaps back to completely enclose the blade.
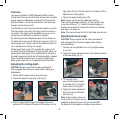
Adjusting the cutting depth
CAUTION. Always ensure that the saw is switched off
and unplugged from the power supply before making any
adjustments.
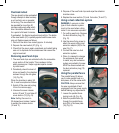
1. Ensure that the saw is facing away from you.
2. Loosen the depth locking lever (19) (Fig. A).
3. Hold the base plate flat against the edge of the work
piece and lift the body of the saw until the blade is at the
right depth (Fig. B). Use the depth of cut indicator (20) to
determine the cutting depth.
4. Tighten the depth locking lever (19).
Note. Always use the correct blade depth setting.
The correct blade depth setting for all cuts should not be
more than (6.35mm) 1/4” below the material being cut.
Allowing more depth will increase the chance of kickback
and result in a rough cut.
Note. The maximum depth of cut for mild steel plate is 6mm.
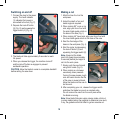
Adjusting the bevel angle
CAUTION. Always ensure that the saw is switched off
and unplugged from the power supply before making
any adjustments.
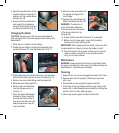
1. The saw can be adjusted to cut at any angle between
0° and 45°.
2. Loosen the bevel adjustment lever (6) located at the front
of the base plate (Fig. C).
3. Tilt the body of the
saw until the required angle
is reached (Fig. D) using the
bevel scale (7) as a guide.
4. Tighten the bevel adjustment
lever (6) to secure the base
plate (Fig. E).
Note. Always make a trial cut in
a scrap piece of material along a
guideline to determine how much you should offset
the blade from the guideline to make an accurate cut.
B
A
D
C
E