8
307–636
Installation
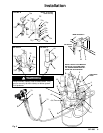
Assembling Sprayer Model 231–015
(See Fig 2)
Connect
the gun air supply hose (71) between the air
inlet (A) of the gun (70) and the nipple (14) at the outlet
of the gun air regulator (B).
Connect the gun fluid supply hose (72) between the
gun fluid inlet (C) and the ball valve (D) mounted in the
side outlet of the fluid filter (25).
WARNING
T
o reduce the risk of serious injury, never connect a
fluid hose to the drain valve (E) mounted in the
bottom outlet of the fluid filter (25). This valve is for
use only as a drain valve, to relieve fluid pressure
in the system during shutdown.
Assembling Sprayer Model 230–978
(See Fig 2)
Remove
the plug button (64) from the hole (F) in the
pail cover (40).
Assemble the fluid regulation kit (75) as shown in
Detail A and Detail B of Fig 2. Install the regulator
mounting bracket (75k) on the regulator (75f), using
the two screws (75p) and lockwashers (75q). Mount
the assembled regulator kit on the pail cover with the
capscrew (75l), washer (75m) and nut (75n). Connect
the regulator hose (75h) between the nipple (75b) at
the regulator inlet (G) and the ball valve (D) mounted
in the side outlet of the fluid filter (25).
Connect the gun air supply hose (71) between the air
inlet (A) of the gun and the nipple (14) at the outlet of
the gun air regulator (B).
Connect the gun fluid supply hose (72) between the
gun fluid inlet (C) and the nipple (75b) mounted in the
pipe cross (75c).
WARNING
T
o reduce the risk of serious injury, never connect a
fluid hose to the drain valve (E) mounted in the
bottom outlet of the fluid filter (25) or the drain
valve (75a) mounted in the pipe cross (75c) of the
fluid regulation kit. These valves are for use only as
drain valves, to relieve fluid pressure in the system
during shutdown.


