


11308609
Service
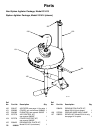
Cleaning the Agitator Shaft and Seal
CAUTION
Keep the agitator upright. Do not lay it on its side or
upside down, or liquid may flow down the shaft and
into the gear reducer area.
If any material is on the shaft (6) within 1/2 in. (13 mm)
of the housing (13), it must be removed to prevent
damage to the bearing seal (14*). If the flexible lips on
the bearing seal are torn or worn such that they do not
make contact all the way around the shaft, the seal
must be replaced. A worn seal may allow foreign mate-
rial into the bearing and cause premature failure. See
Servicing the Gear Reducer on page 11 for instruc-
tions on getting access to the seal and for the Bearing
Replacement Kit Part No.
Cleaning an Agitator with a Siphon Kit
The procedure for flushing and cleaning the siphon
tube (50) and agitator shaft (6) is as follows:
1. Raise the agitator out of the drum.
2. Remove the plain bearing (53) from the agitator
shaft (6), and clean it.
3. Detach any attachments from the siphon tube, and
flush the siphon tube.
4. Loosen the retaining nut (52), and slowly lift the
siphon tube (50) out of the agitator.
5. Clean the inside and outside of the siphon tube
(50), flush the inside of the agitator shaft (6), and
clean the agitator blades (28) and the outside of
the shaft.
6. Reassemble the siphon tube by doing the reverse
of steps 2 through 4.
Servicing the Gear Reducer
You may want to have the Bearing Replacement Kit on
hand before you begin this procedure. To order a
Bearing Replacement Kit, order Part No. 238251.
Disassembling
The following procedure does not require that you
remove the agitator from the drum of material:
1. If your agitator has a siphon kit, do steps 2 through
4 in Cleaning an Agitator with a Siphon Kit on
page 11. If your agitator does not have a siphon
kit, proceed to step 2 below.
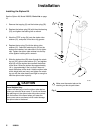
2. Raise/support the drum cover above the drum high
enough so that you can reach the underside of it.
3. Remove the three hex head screws (25) that hold
the agitator to the drum cover.
4. Raise the agitator housing 4 to 6 in. (100 to
150 mm) above the drum cover, and support it at
that height with blocks.
5. Tightly grip the agitator shaft with a clamp to
prevent the shaft from falling into the drum.
6. Remove the two short bolts (11) and the two long
bolts (19) that hold the upper housing (8) and the
lower housing (13) together. Carefully lifting
straight up, lift the upper housing off of the lower
housing.
7. Turn the large gear (10) counter-clockwise to
remove it from the agitator shaft, and lift the pinion/
gear assembly (3, 16) out of the lower housing.
NOTE: Before you do step 8, check to be sure the
agitator shaft is well secured. See step 5.
8. Turn the 50 mm nut (26) counter-clockwise to
remove it from the agitator shaft.
9. Carefully lift the lower housing (13) off of the
agitator shaft.