


12 308609
Service
Servicing the Gear Reducer, continued
Cleaning and Servicing
1. Clean any foreign material off of the outside of the
upper and lower housings (8 and 13).
NOTE: Do not lose the two small thrust balls (4).
One is in the upper housing (8), and one is in the
lower housing (13).
2. Inspect the parts for any wear. If any of the parts
are worn or damaged, replace them. The Bearing
Replacement Kit contains replacement bearings
and seals (items 2, 7, 9, 12, 14, and 15).
Reassembling
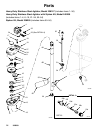
NOTE: See the Parts Drawing on page 14 for proper
bearing and seal placement and orientation.
1. Reposition the lower housing (13) on the agitator
shaft.
CAUTION
To prevent damage to the bearings and seals, avoid
scraping them against the threaded agitator shaft
while you are lowering the lower housing in place.
2. Thread the 50-mm nut (26) onto the agitator shaft
by turning it clockwise, and tighten it hand tight.
3. Reposition the pinion/gear assembly (3, 16) in the
lower housing, thread the large gear (10) onto the
agitator shaft, and tighten the large gear hand
tight.
4. Make sure the small thrust balls (4) are in place.
5. Carefully lowering it straight down, reposition the
upper housing (8) on the lower housing (13).
6. Replace the two short bolts (11) and the two long
bolts (19) that hold the upper housing (8) and the
lower housing (13) together, and torque the bolts
to 75 in-lb (8.5 N-m).
7. Remove the blocks that you have supporting the
agitator housing, and reposition the agitator on the
drum cover.
8. Thread the three hex head screws (25) up through
the drum cover and into the agitator, and torque
them to 75 in-lb (8.4 N-m).
9. If your agitator has a siphon kit, re-install it by
doing the reverse of steps 2 through 4 in Cleaning
an Agitator with a Siphon Kit on page 11.
Additional Agitator Service
If the unit requires more than installation of a bearing
replacement kit or gear replacement, it may be advis-
able to send the unit to a Graco distributor for repair or
replacement.