


10 308-230
Operation
Pressure Relief Procedure
PRESSURIZED
EQUIPMENT HAZARD
The system pressure must be manually relieved to
prevent the system from starting or spraying acci
-
dentally. T
o reduce the risk of an injury from acci
-
dental spray from the gun, splashing fluid, or mov
-
ing parts, follow the
Pressure Relief Procedure
whenever you:
D
are instructed to relieve the pressure,
D
stop spraying,
D
check or service any of the system equipment,
D
or install or clean the spray tips.
WARNING
1.
Shut of
f the air to the pump.
2. T
rigger the spray gun.
3.
Open the fluid drain valve to relieve all fluid pres
-
sure, having a container ready to catch the drain
-
age.
Flush the Pump Before First Use
The
pump was tested in water
. If the test solution
could contaminate the fluid you are pumping, flush the
pump thoroughly with a compatible solvent. Follow the
procedure in
Starting and Adjusting the Pump.
Starting and Adjusting the Pump
TOXIC
FLUID HAZARD
Hazardous fluid or toxic fumes can
cause serious injury or death if splashed
in the eyes or on the skin, inhaled, or
swallowed. Do not lift a pump under pressure. If
dropped, the fluid section may rupture. Always fol
-
low the
Pressure Relief Procedure
above before
lifting the pump.
WARNING
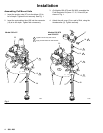
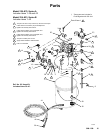
1.
Be sure the pump is properly grounded. Read
FIRE OR EXPLOSION HAZARD
on page 3.
2.
Check all fittings to be sure they are tight. Be sure
to use a compatible liquid thread sealant or
r
tape on all male threads. T
ighten the fluid inlet and
outlet fittings snugly
. Do not overtighten the fittings
into the pump.
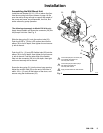
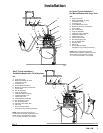
3.
On pail mount units,
place the suction tube in a
pail of fluid and attach the pail cover using the
thumbscrews. T
ighten securely
.
On wall mount units,
install the suction tube and
bung plug in the fluid supply drum as explained on
page 5.
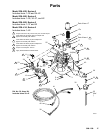
4.
Make sure the air regulators (G and H) and bleed
valves (B and E) are closed. Open the fluid drain
valve (J).
5.
Connect the air line coupler (D) to the air inlet fit
-
ting.
6.
With the gun air regulator (G) closed, open the
bleed-type master air valves (B, E) and the pump
air regulator (H).
7.
Allow the pump to cycle slowly until all air is
pushed out of the recirculation line and the pump
is primed.
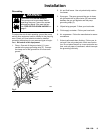
8.
Point the spray gun (R) into a grounded metal pail,
holding a metal part of the gun firmly to the side of
the pail.
9. T
rigger the air spray gun. Open the gun air regula
-
tor (G) and close the fluid drain valve (J). Allow the
pump to cycle slowly until all air is pushed out of
the fluid hose and gun.
If you are flushing,
run the pump long enough to
thoroughly clean the pump and hoses. Close the
air regulator
. Remove the suction tube from the
solvent and place it in the fluid to be pumped.
PTFEPTFEPTFE