


9308455
Operation
I. Pressure Relief Procedure.
WARNING
PRESSURIZED EQUIPMENT HAZARD
The system pressure must be manually relieved to
prevent the system from starting or spraying acci-
dentally. To reduce the risk of an injury from acci-
dental spray from the gun, splashing fluid, or
moving parts, follow the Pressure Relief Proce-
dure whenever you:
D are instructed to relieve the pressure,
D stop spraying,
D check or service any of the system equipment,
D install or clean the spray nozzle,
D or before loosening or removing the pressure
pot cover or fill port.
1. Close the gun air shutoff valve (17a). See Fig. 5.
2. Open the air relief valve (7) by turning it counter-
clockwise. Leave it open until you reinstall the
pressure pot cover or fill port.
3. Wait until there is no air escaping through the drain
cock fitting before removing the pressure pot cover
or opening the fill port.
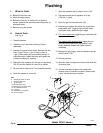
II. Flush the pressure pot before the
first use.
Flush with a solvent compatible to your fluid. Consult
the fluid manufacturer’s literature for recommenda-
tions. See Flushing on page 11.
III. Prime the system.
1. Remove the pressure pot cover.
2. Place a 5 gal. (20 liter) metal pail of fluid in the pres-
sure pot, or install the pressure pot liner (supplied)
and fill it with up to 5 gal. (20 liter) of fluid.
NOTE: Order part no. 15D059 for a package of 20
liners.
3. Tighten the c-clamp handles (27) securely.
4. Close the pressure pot and gun air regulators (33,
36).
5. Be sure the air relief valve (7) is closed (clockwise).
6. Be sure the pressure pot air shutoff valve (17b) is
closed (valve handle at a right angle to the valve
body), and then connect the air line (C) to the valve.
7. Open the master air valve (A).
8. Open the pressure pot air shutoff valve (17b).
9. Adjust the pressure pot air regulator (33) to 10 psi
(69 kPa, 0.7 bar).
10. Open the fluid shutoff valve (18).
11. Hold the gun against and aimed into a grounded
metal waste pail. Trigger the gun slowly. The gun
will emit air until the fluid arrives. When fluid flows
freely, release the gun trigger.
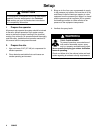
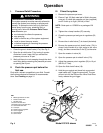
Fig. 5
A
17a
17b
18
36
4
7
33
40
43
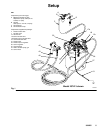
KEY
A Bleed-type master air valve
4 Pressure relief valve
7 Air relief valve
17aGun air shutoff valve
17bPressure pot air shutoff valve
18 Gun fluid shutoff valve
27 C-clamps
33 Pressure pot air regulator
36 Gun air regulator
40 Gun fluid hose
43 Gun air hose
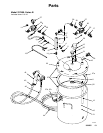
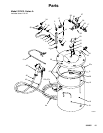
TI0750BModel 237413 shown
27